> For the complete documentation index, see [llms.txt](https://docs.pascom.net/llms.txt). Markdown versions of documentation pages are available by appending `.md` to page URLs; this page is available as [Markdown](https://docs.pascom.net/setup/endpoints/snom-conference.md).

# Snom Konferenzsystem

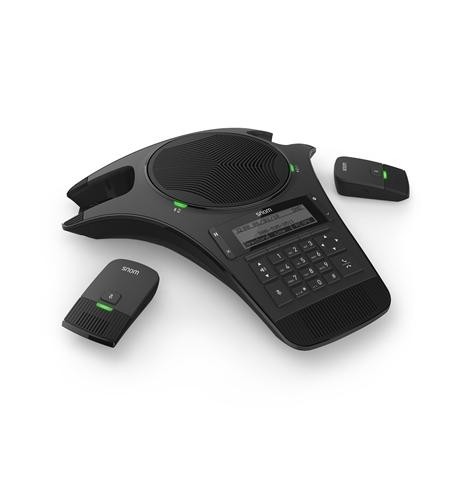
Integrieren Sie Ihr Snom Konferenzsystem in die PASCOM.

<figure><img src="https://1983379169-files.gitbook.io/~/files/v0/b/gitbook-x-prod.appspot.com/o/spaces%2FLe82Z891Z9TUVDeTD5WX%2Fuploads%2Fgit-blob-64f65712cb90eb8a7b4a68189eb1a1edc0bbd7b7%2Fsnom_c520.jpg?alt=media" alt="Snom C520" width="60%"><figcaption></figcaption></figure>

## Unterstützte Geräte

| Modelle   |   |
| --------- | - |
| Snom C520 |   |

## Vorbereitung

Für die Inbetriebnahme ist ein funktionierender DHCP-Server zwingend erforderlich. Schließen Sie jetzt das Konferenzsystem an das Netzwerk an. Notieren Sie sich die **IP-Adresse** die das Konferenzsystem vom DHCP-Server erhalten hat.

### Neue Basiskonfiguration erstellen

Als nächstes muss eine neue Basiskonfiguration für das Konferenzsystem gebaut werden. Gehen Sie dazu auf der WEB GUI auf **Endgeräte** > **Basis-Konfigurationen**

{% hint style="success" %}
Mit der PASCOM Version 19.03 gibt es eine neue Basiskonfiguration **Empty Generic Profile**
{% endhint %}

Duplizieren Sie die Basiskonfiguration **Empty Generic Profile** und geben Ihr eine Bezeichnung z.B. SNOM C520 Konferenz. Markieren Sie die neue Basiskonfiguration und klicken auf **Bearbeiten** > **Konfiguration**.

**Ersetzen Sie nun den vorhandenen Code mit nachfolgenden Code Snipped:**

```
<?xml version="1.0"?>
<settings>
	<time_date>
		<date_format>DD/MM/YY</date_format>
		<hr24_clock>1</hr24_clock>
		<ntp_dhcp_option>0</ntp_dhcp_option>
		<ntp_server>1</ntp_server>
		<ntp_server_addr>pool.ntp.org</ntp_server_addr>
		<ntp_server_update_interval>1000</ntp_server_update_interval>
		<timezone_dhcp_option>0</timezone_dhcp_option>
		<selected_timezone>Europe/Berlin</selected_timezone>
	</time_date>
	<profile>
		<admin>
			<access_password>{{{admin_password}}}</access_password>
		</admin>
	</profile>
	<remoteDir>
{{!-- LDAP settings --}}
{{#if_eq ldap_proxy 'off'}}

		<ldap_directory_name></ldap_directory_name>
		<ldap_number_filter></ldap_number_filter>
		<ldap_firstname_filter></ldap_firstname_filter>
		<ldap_lastname_filter></ldap_lastname_filter>
		<ldap_server_address></ldap_server_address>
		<ldap_port>389</ldap_port>
		<ldap_authentication_type>simple</ldap_authentication_type>
		<ldap_base></ldap_base>
		<ldap_user_name></ldap_user_name>
		<ldap_access_password></ldap_access_password>
		<ldap_max_hits>200</ldap_max_hits>
		<ldap_work_number_attributes></ldap_work_number_attributes>
		<ldap_mobile_number_attributes></ldap_mobile_number_attributes>
		<ldap_other_number_attributes></ldap_other_number_attributes>
		<ldap_protocol_version>version_3</ldap_protocol_version>
		<ldap_search_delay>0</ldap_search_delay>
		<ldap_incall_lookup_enable>0</ldap_incall_lookup_enable>
		<ldap_outcall_lookup_enable>0</ldap_outcall_lookup_enable>
		<ldap_enable>0</ldap_enable>
		<ldap_firstname_attribute></ldap_firstname_attribute>
		<ldap_lastname_attribute></ldap_lastname_attribute>
		<ldap_check_certificate>0</ldap_check_certificate>
		<broadsoft_enable>0</broadsoft_enable>
{{else}}

		<ldap_directory_name>pascom LDAP</ldap_directory_name>
		<ldap_server_address>{{{httpip}}}</ldap_server_address>
		<ldap_number_filter>(&amp;(telephoneNumber=%)(cn=*))</ldap_number_filter>
		<ldap_base>dc=phonebook,{{{ldap_suffix}}}</ldap_base>
		<ldap_access_password>{{{ldap_password}}}</ldap_access_password>
		<ldap_max_hits>200</ldap_max_hits>
		<ldap_work_number_attributes>telephoneNumber</ldap_work_number_attributes>
		<ldap_mobile_number_attributes>mobile</ldap_mobile_number_attributes>
		<ldap_other_number_attributes>telephoneNumber</ldap_other_number_attributes>
		<ldap_protocol_version>version_3</ldap_protocol_version>
		<ldap_search_delay>0</ldap_search_delay>
		<ldap_incall_lookup_enable>1</ldap_incall_lookup_enable>
		<ldap_outcall_lookup_enable>1</ldap_outcall_lookup_enable>
		<ldap_enable>1</ldap_enable>
		<ldap_firstname_attribute>cn</ldap_firstname_attribute>
		<ldap_lastname_attribute></ldap_lastname_attribute>
		<ldap_check_certificate>0</ldap_check_certificate>
		<broadsoft_enable>0</broadsoft_enable>
{{#if vpnconnection}}

		<ldap_port>389</ldap_port>
		<ldap_authentication_type>simple</ldap_authentication_type>
{{else}}

		<ldap_port>636</ldap_port>
		<ldap_authentication_type>ssl</ldap_authentication_type>
{{/if}}

		<ldap_firstname_filter>(|(cn=%)(sn=%))</ldap_firstname_filter>
		<ldap_lastname_filter>(|(cn=%)(sn=%))</ldap_lastname_filter>
		<ldap_user_name>cn={{{ldap_username}}},dc=devices,{{{ldap_suffix}}}</ldap_user_name>
{{/if_eq}}

	</remoteDir>
{{!-- SIP settings --}}

	<sip_account>
		<idx id="1">
			<sip_account_enable>1</sip_account_enable>
			<label>{{{displayname}}}</label>
			<display_name>{{{displayname}}}</display_name>
			<primary_outbound_proxy_server_address>{{{httpip}}}</primary_outbound_proxy_server_address>
			<user_id>{{{013pee_username}}}</user_id>
			<authentication_name>{{{013pee_username}}}</authentication_name>
			<authentication_access_password>{{{013pee_password}}}</authentication_access_password>
			<primary_sip_server_address>{{{cs_domain}}}</primary_sip_server_address>
			<primary_registration_server_address>{{{cs_domain}}}</primary_registration_server_address>
			<unregister_after_reboot_enable>0</unregister_after_reboot_enable>
			<registration_retry_time>10</registration_retry_time>
			<mwi_subscription_expires>3600</mwi_subscription_expires>
			<primary_registration_expires>3600</primary_registration_expires>
			<access_code_retrieve_voicemail>{{{setting sys.asterisk.dialplan.global.voicebox.watched.value }}}</access_code_retrieve_voicemail>
{{#if_eq voip_sip 'tls'}}

			<primary_outbound_proxy_server_port>5061</primary_outbound_proxy_server_port>
			<transport_mode>tls</transport_mode>
			<primary_sip_server_port>5061</primary_sip_server_port>
			<primary_registration_server_port>5061</primary_registration_server_port>
			<local_sip_port>5061</local_sip_port>
			<voice_encryption_enable>1</voice_encryption_enable>
{{else}}
    {{#if_eq voip_sip 'udp'}}

			<primary_outbound_proxy_server_port>5060</primary_outbound_proxy_server_port>
			<transport_mode>udp</transport_mode>
			<primary_sip_server_port>5060</primary_sip_server_port>
			<primary_registration_server_port>5060</primary_registration_server_port>
			<local_sip_port>5060</local_sip_port>
			<voice_encryption_enable>0</voice_encryption_enable>
    {{else}}

			<primary_outbound_proxy_server_port>5060</primary_outbound_proxy_server_port>
			<transport_mode>tcp</transport_mode>
			<primary_sip_server_port>5060</primary_sip_server_port>
			<primary_registration_server_port>5060</primary_registration_server_port>
			<local_sip_port>5060</local_sip_port>
			<voice_encryption_enable>0</voice_encryption_enable>
    {{/if_eq}}
{{/if_eq}}

			<codec_priority>
				<idx id="1">g711u</idx>
				<idx id="2">g711a</idx>
				<idx id="3">g729</idx>
				<idx id="4">g726</idx>
				<idx id="5">g722</idx>
			</codec_priority>
		</idx>
	</sip_account>
{{!-- Language --}}

	<user_pref>
		<language>de</language>
		<web_language>en</web_language>
	</user_pref>
</settings>

```

Speichern Sie die Basiskonfiguration ab.

## Konferenzsystem anlegen

Legen Sie unter **Endgeräte** > **Geräteliste** ein neues Gerät vom Typ **IP-Telefon: Hersteller beliebig oder Softphone** an. Wählen Sie nun die erstellte **neue Basiskonfiguration** aus (SNOM C520 Konferenz).

Unter dem Reiter **Zuweisen** geben Sie dem Konferenzgerät noch einen Benutzer. Abschließend Speichern!

## Konferenzsystem provisionieren

Markieren Sie das Konferenzsystem in der Geräteliste und gehen zu **Aktion** > **Provisioning URL** wo Sie sich die **Provisionierungs-URL** in die Zwischenablage kopieren.

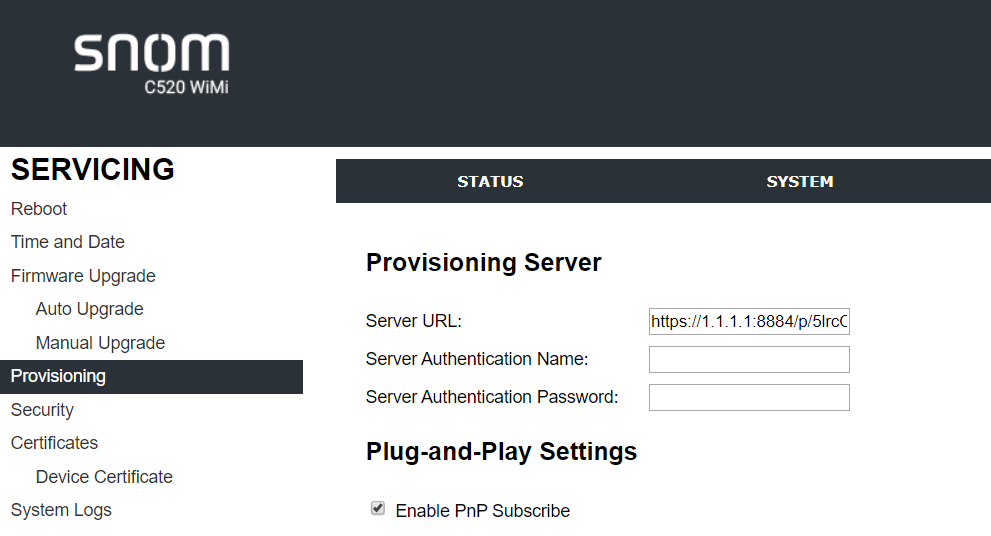
Mit der zu Beginn notierten IP-Adresse gehen Sie auf die Weboberfläche Ihres SNOM Konferenzsystem. Unter **Servicing** > **Provisioning** finden Sie das Feld **Server URL** in dem die **Provisioning URL** hinterlegt werden muss. Klicken Sie auf **Speichern** und führen einen Neustart des Konferenzsystem mit einem Klick auf **Reboot** aus.

<figure><img src="https://1983379169-files.gitbook.io/~/files/v0/b/gitbook-x-prod.appspot.com/o/spaces%2FLe82Z891Z9TUVDeTD5WX%2Fuploads%2Fgit-blob-c79623cd0d411c09bf54392a4a28e7c860164ad9%2FSNOM_GUI.PNG?alt=media" alt="Snom C520" width="80%"><figcaption></figcaption></figure>


---

# Agent Instructions
This documentation is published with GitBook. GitBook is the documentation platform designed so that both humans and AI agents can read, navigate, and reason over technical content effectively. Learn more at gitbook.com.

## Querying This Documentation
If you need additional information that is not directly available in this page, you can query the documentation dynamically by asking a question.

Perform an HTTP GET request on the following URL with the `ask` and `goal` query parameters:

```
GET https://docs.pascom.net/setup/endpoints/snom-conference.md?ask=<question>&goal=<user_goal>
```

`ask` is the immediate question: it should be specific, self-contained, and written in natural language.
`goal` is what the user is ultimately trying to achieve, the reason they need the answer. Sharing it helps GitBook give you a better, more relevant answer. A goal is most helpful when it describes the outcome the user wants rather than restating the question. For example, with `ask=how do I create an API token`, a goal like `build a script that syncs our docs to a CMS` lets GitBook tailor the answer to that use case.

The response will contain a direct answer to the question and relevant excerpts and sources from the documentation.

Use this mechanism when the answer is not explicitly present in the current page, you need clarification or additional context, or you want to retrieve related documentation sections.