> For the complete documentation index, see [llms.txt](https://docs.pascom.net/llms.txt). Markdown versions of documentation pages are available by appending `.md` to page URLs; this page is available as [Markdown](https://docs.pascom.net/en/setup/endpoints/snom.md).
# Snom Desktop Phones
Integrate your Snom VoIP phones into your PASCOM business phone system

## Supported Endpoints
{% hint style="warning" %}
Snom 3xx and 7xx series IP phones are not compatible with the PASCOM cloud phone system.
{% endhint %}
| Models | |
| --------- | --------- |
| Snom D1XX | Snom D3XX |
| Snom D7XX | Snom D8XX |
[SNOM EOL List](https://service.snom.com/display/wiki/Snom+products+lifecycle)
| Provisioning | Firmware Management | Desktop App CTI Control | PASCOM Menu |
| ------------ | ------------------- | ----------------------- | ----------- |
| yes | yes | yes | yes |
**Provisioning**: The IP phone is managed via the PASCOM PBX web UI.\
**Firmware Management**: Firmware can be managed and updated via the PASCOM PBX web UI.\
**Desktop App CTI Control**: The Desktop App can remotely control the phone, i.e. to start calls.\
**PASCOM Menu**: A button on the phone will be assigned to access the PASCOM menu.
{% hint style="info" %}
Due to vast range of firmware versions available for the different IP telephones, it is not possible for us to test each version. Therefore, it could be the case that PASCOM does not support some firmware versions.
{% endhint %}
## Snom Provisioning
The process of configuring or registering an VoIP phone with an IP PBX such as PASCOM's is know as **Provisioning**. For this purpose, PASCOM cloud phone systems include a Default Configuration (**Devices** > **Basic Configuration**). For most deployment scenarios, these standard settings provide an ideal configuration. However, in some cases, the settings may need to be modified.
## Add New Phone
### 1. Finding the MAC Address
MAC addresses can be found on the rear underside of the telephone.
Alternatively, the MAC address is often found on the product packaging.
### 2. Add Phones / Endpoints
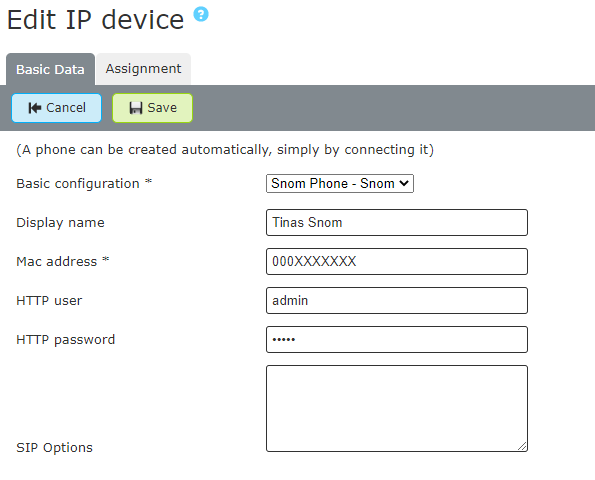
Log into your PASCOM cloud phone system and under **Devices** > **Device list** and press **Add** and select the option **IP Telephone: Manufacturer Snom**.

Select a **display name** for the telephone.
Under the corresponding field, enter the **Mac-Address** that you have just found and noted.
To be on the safe side, use your own **HTTP user** and **HTTP password** data for the phone. This will overwrite the manufacturer's default data during provisioning.
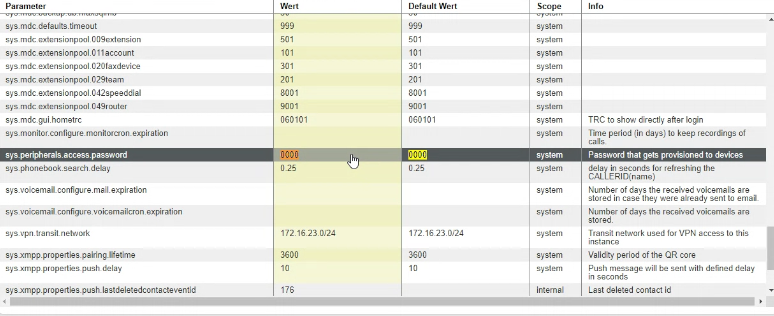
If you want to provision many endpoints, you can set a separate **HTTP password** globally for all provisioning in the system settings.
### 3. Assigning Users
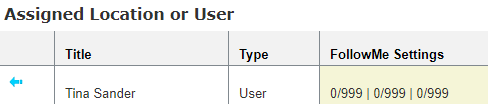
As soon as the IP phone has appeared in the Device List, it can be edited via the **Edit** button. Under the **Assign** tab, the phone can be assigned to a [user (or location)](/en/setup/user/user-concept.md)
### 4. Apply Jobs
After saving your phone setup configurations, a corresponding prompt to apply telephony configs will appear in the job box (top of the screen). Simply start the job by clicking on the **green tick**.
### 5. Connect the Phone
Connect the phone to your network. Snom IP phones come with a built in switch, allowing you to connect the phone directly via the Ethernet port labelled as **NET**. Should you not have a **PoE** option available, connect the phone to a power supply.
**Is the phone already integrated in your network?**
1. Restart the Phone.
{% hint style="success" %}
Should the telephone not be factory new, ensure you perform a **factory reset**. In order to do this on the phone, power up the phone and then press \*\*\*\* + ##\*\* holding the Buttons \*\*\* + #\*\* until the phone restarts. Confirm by pressing **1** to perform the factory reset.
{% endhint %}
### 6. Function testing
The simplest method of testing whether a device has been successfully deployed is to call ones Voicemail box via **\*100**. On successfully provisioned phones, you should now hear your Voicemail box prompts.
### PASCOM Menu Key
After the provisioning process, the **Menu** button on Snom phones is no longer assigned to the Telephone Menu, but rather to a telephone specific PASCOM Menu making the following PASCOM cloud phone system functions available:
| Function | Description |
| -------------------- | ----------------------------------------------------------------------------------------------------------------------------- |
| Telephone Book | Opens up the central PBX phonebook. |
| Journal | Displays answered, dialed and missed calls |
| Call Forwarding | Sets a call forwarding, activates / updates a previously configured call forwarding or deactivates an active call forwarding. |
| Voicemail Box | Voicemail box menu for activating/deactivating your mail box, plus message play backs |
| Login | Enables a user to log into the location where the phone is (Hotdesking / roaming users). |
| Logout \[*username*] | Logs out the current user from this location. |
| Teams (Queues) | Is used for agent management within a queue (login, logout, pause..) according the configuration of the queue. |
Should the Snom IP telephone not have a menu key (i.e. Snom 300, 710 or D715), then the second function key will be assigned with the PASCOM menu function.
{% hint style="success" %}
Only set Call Forwardings via the PASCOM menu as they can then be managed by the PBX and reflected within the Desktop App etc.
{% endhint %}
{% hint style="info" %}
Using the DND key (*do not disturb*) directly on your Snom phone, ensures that the assigned user extension cannot be reached on the phone. The DND notice will appear only on the telephone itself and will have no impact on other endpoints or the Desktop App (softphone).
{% endhint %}
### Accessing the Snom Telephone Web UI
In order to access your telephone's web UI, you will need to know the phone's IP address. The following outlines the different methods of discovering the phone IP Address:
#### Finding the IP-Address on the Telephone
Press the **?** (i.e. the **help**) in order to call up the phone IP address.
#### Finding the IP-Address via the PASCOM Web UI Device List
Log into the PBX Web UI and select the **Devices** > **Device list**, which provides you an overview of all available devices. To the left of each entry is an *Info* symbol which when clicked will open an overview of the provisioned telephone including the IP address.
#### Admin Rights
In order to access certain menu options with the Snom Telephone web UI, you will require admin rights. To do this simply go the **Advanced** menu point and now enter the Admin Password.
### Function Keys
In the menu of the left, click on the **Function Keys** option.
#### User / Extension Monitoring with BLF Keys
Using the function keys, it is possible to monitor other extensions (i.e. users). The BLF keys (Busy Lamp Field) can be used to provide status information relating to the monitored extension. In this scenario, monitoring means watching the extension to see if the user is currently on the phone, being called or to answer calls intended for this extension (call pickup).
| Context | Type | Number | Short Text |
| ------------------------- | ------- | ------------------------------------------------------------------------- | -------------------------------------------------------------------------------------------------------- |
| Select Account / Identity | **BLF** | The extension to be monitored (e.g. 123) in the following format 123\|\*8 | Should the telephone have a second display for paperless keys, then the keys labels can be entered here. |
Alongside user extensions, it is also possible to configure keys as login / out codes for queues or to configure them as an extension switch.
#### Additional Useful Function Keys
| Function Key | Description |
| -------------- | ---------------------------------------- |
| **Speed Dial** | Can be assigned with a telephone number. |
| **DTMF** | Can be assigned with DTMF characters. |
### Default Configuration
As previously stated, Snom IP phones are provisioned using the default configurations which can be found under **Devices** > **Basic Configurations**.
{% hint style="info" %}
When modifying the default configuration settings, ensure you make a duplicate copy of the original using the **Duplicate** tool.
{% endhint %}
In addition, you can set an already edited default configurations as the **standard settings**. Doing so ensures that all newly added IP telephones will automatically be provisioned with these default configurations.
#### Assigning a Default Configuration
A default configuration can be assigned using multiple methods:
* Via **Devices** > **Basic Configurations** > Choose your Basic configuration set and press **Edit** Under the **Devices** tab, it is possible to add multiple IP telephones.
* Via **Devices** > **Device list** > Select and edit the IP Telephone and under the tab **Basic Data** choose the correct **Basic configuration** option.
#### Automatic BLF Key Configuration via Basic Configurations
Under the **Configuration** tab, it is possible to modify the existing basic configuration. Under the **Keys** section you will find the already pre-configured function keys which provide a useful guideline to work with.
Navigate to the Snom Telephone web UI and under *Function Keys* configure the **P1** button as an example. As type, select **BLF**, and as number **123|\*8** and **ExampleUser** as the short text. Once done, apply the settings.
Next, click on the *Settings* menu option. Should this option not be visible, you will require [admin rights](#accessing-the-snom-telephone-web-ui).\
Search for *fkey0* and *fkey\_label0*. Next copy and paste the search result lines into the phone system web UI:
```
{{!-- keys -}}
blf sip:123@{{{cs_domain}}}|{{{setting sys.asterisk.pickup.prefix.snom}}}
```
Via the menu tab **devices**, assign these default configurations to the telephones which should have this BLF configuration. Save and apply your changes and once the phones have restarted, the changes will have taken affect.
## Firmware Updates
From mobydick version 7.14 onwards, IP endpoint firmware will no longer be included as standard. Should a firmware version (other than the version pre-installed on the phone) be required, this must be externally sourced and per hand uploaded to the phone system firmware management tool.
### Upload New Firmware
The desired firmware can be uploaded via the the **Devices** > **Device firmware**:
| Settings | Description |
| -------------- | ---------------------------------------------------------------------------------------------------------------------------------------------- |
| Firmware Files | Upload the firmware files here. Firmware can be found here: [Snom Support Wiki](https://service.snom.com/display/wiki/Firmware+Update+Center). |
| Model | Snom Telephone model name |
| Version | Firmware Version |
| Comments | Optional field for notes |
### Firmware Roll Outs
Firmware updates can be rolled out via the **Devices** > **Device list** menu. Simply select the desired Snom Endpoints from the list via the check boxes and click **Actions** > **Roll out firmware**. This will open an overview of all selected devices to which the new firmware version should be rolled out to. Click **Firmware Update** to roll out the desired firmware version.
---
# Agent Instructions
This documentation is published with GitBook. GitBook is the documentation platform designed so that both humans and AI agents can read, navigate, and reason over technical content effectively. Learn more at gitbook.com.
## Querying This Documentation
If you need additional information that is not directly available in this page, you can query the documentation dynamically by asking a question.
Perform an HTTP GET request on the following URL with the `ask` and `goal` query parameters:
```
GET https://docs.pascom.net/en/setup/endpoints/snom.md?ask=&goal=
```
`ask` is the immediate question: it should be specific, self-contained, and written in natural language.
`goal` is what the user is ultimately trying to achieve, the reason they need the answer. Sharing it helps GitBook give you a better, more relevant answer. A goal is most helpful when it describes the outcome the user wants rather than restating the question. For example, with `ask=how do I create an API token`, a goal like `build a script that syncs our docs to a CMS` lets GitBook tailor the answer to that use case.
The response will contain a direct answer to the question and relevant excerpts and sources from the documentation.
Use this mechanism when the answer is not explicitly present in the current page, you need clarification or additional context, or you want to retrieve related documentation sections.