> For the complete documentation index, see [llms.txt](https://docs.pascom.net/llms.txt). Markdown versions of documentation pages are available by appending `.md` to page URLs; this page is available as [Markdown](https://docs.pascom.net/en/setup/endpoints/mitel-dect.md).
# Mitel DECT Systems
How to integrate your Mitel / Aastra DECT system with your PASCOM cloud phone system.
## Supported Endpoints
| Models | |
| ------------ | - |
| Mitel RFP 4X | |
## Overview
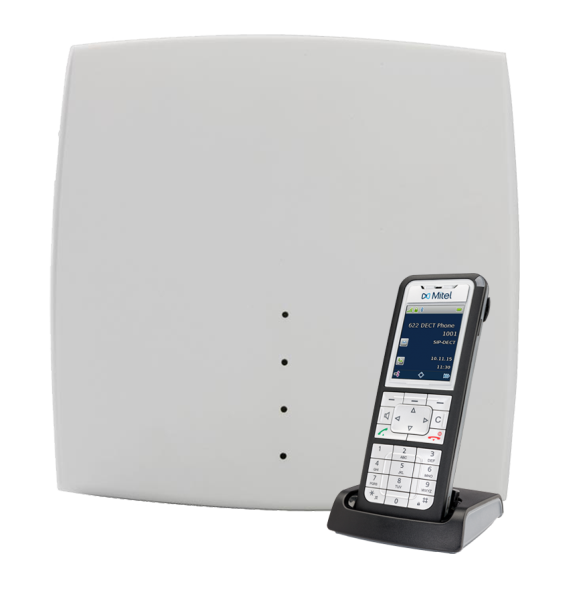
An Mitel SIP-DECT system can have any number from 1 to 254 base stations. The base stations are connected to the IP telephone network and communicate with your [PASCOM VoIP Software](https://www.pascom.net/en/) solution using the SIP protocol. The base stations also communicate with one another using DECT to allow for switching between base stations during a call. A single base station does not have to connect to every other base station, but all base stations must be able to form a chain. Isolated groups of base stations should not be used.
One base station takes care of the user management and the connection to PASCOM. The master starts the **OpenMobility Manager (OMM)**. This software is used for management tasks and comes with a web interface. If a master base station fails, another base station that was previously specified can take over the role of the master.
{% hint style="info" %}
The base stations do not have a power supply but are powered using Power over Ethernet (PoE) technology. Availability of a PoE-compatible switches must be ensured prior to installation.
{% endhint %}
### Base Station Boot Process
All base stations (DECT Transmitters) use identical hardware, whether they are used as a master or not. You should first plan which roles the base stations should serve, which is the master, which is the failover and which run as normal base stations before deploying them by using the **OpenMobility Configurator (OMC)**.At this point you should also configure static IP addresses for the base stations.
### Preparing the DECT Base Station
In order to use PASCOM's automatic provisioning, the DECT sender must be running at least firmware version 7.0.
1. Connect the relevant DECT sender to your network
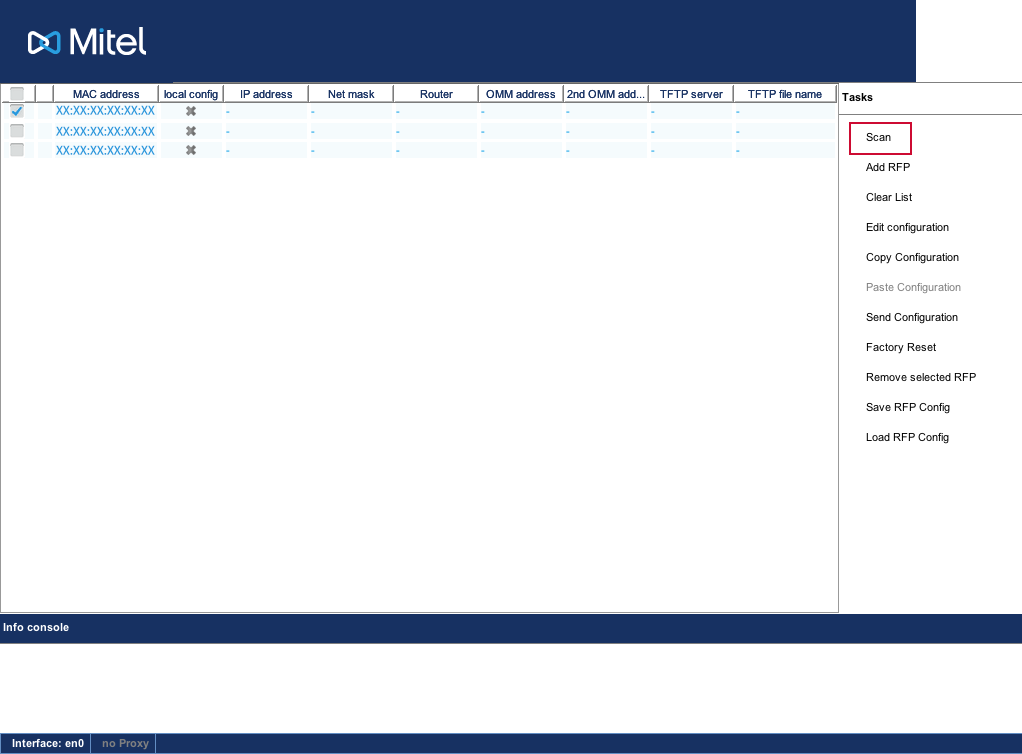
2. Start the **OpenMobility Configurator**, which contains the firmware, on a computer on the same network as the sender
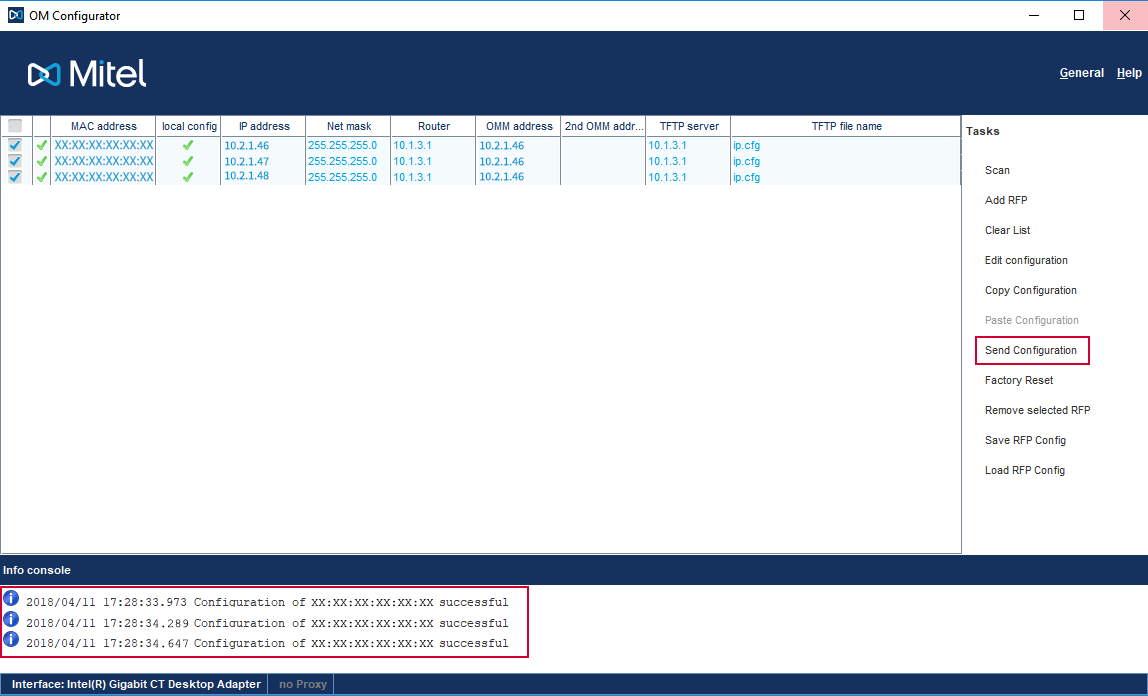
3. Click on **Scan** and search for the MAC address of the Base Station that you want to configure and then enter the DECT sender log in credentials. The MAC address is found on the back of the DECT sender. The username and password are per default (as delivered) both set to **omm**.
{% hint style="info" %}
Repeat **Step 3** until you have found all the DECT senders on your network.
{% endhint %}
4. Select a DECT sender from the list
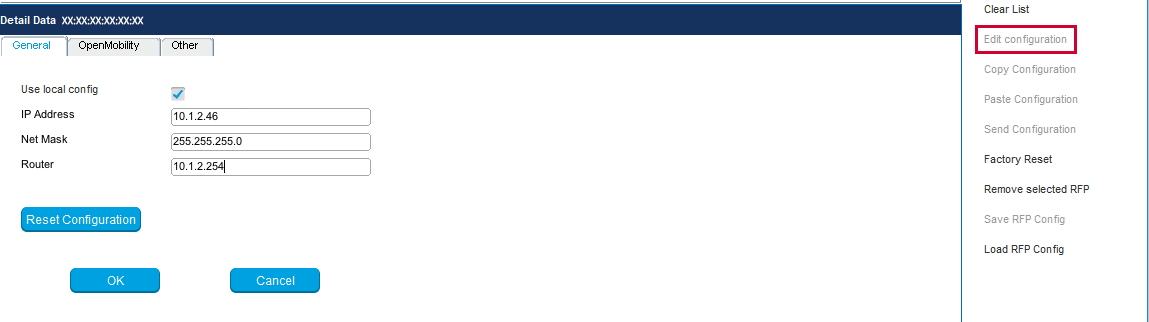
5. Click **Edit configuration** and under **General** set the IP address with which the DECT sender should be assigned inside your PASCOM cloud phone system telephony network.
6. As **Router** enter the IP address of the PASCOM cloud phone system and check the **Local Config** box.
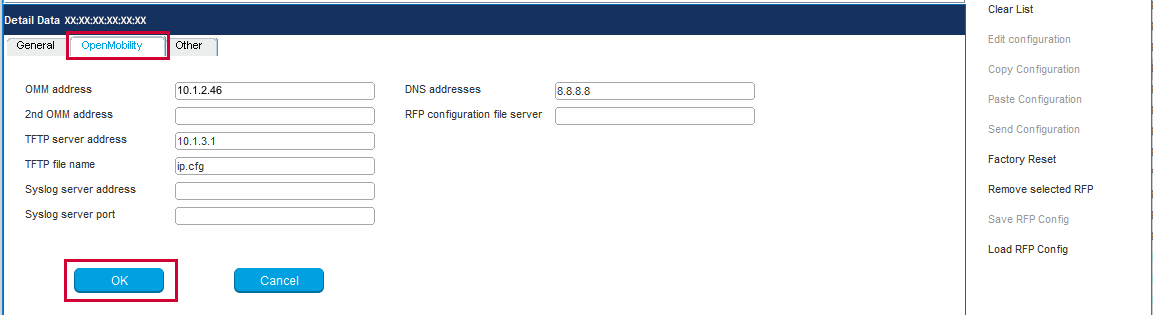
7. Set the IP address of the DECT sender which should be configured as the master sender under **OpenMobility** > **OMM-address**. On the master base station itself, it is neccesary to specify the IP address of DECT sender itself.
8. Under **TFTP server address** enter the PASCOM cloud phone system IP address or your TFTP server.
9. Under **TFTP file name** enter the value "*ip.cfg*" or the name of the firmware version "*iprfp3G.dnld*" (RFP35 or higher höher) / "*iprfp2G.tftp*" (RFP34 or lower ).
10. Once you have implemented all the settings, click on **Send Configuration** in order to send the changes to the selected sender.
{% hint style="info" %}
Repeat **steps 4** to **10** until all DECT senders have been configured.
{% endhint %}
## Configuration
### Add MASTER DECT Sender
{% hint style="info" %}
Please note that in mixed deployments involving RFP 32, RFP 34 and RFP 35 senders or higher, it is essential to set a type RFP 35 sender or higher as the master base station, as the RFP 32 senders can no longer act as masters from firmware version 3.0.
{% endhint %}
Under **Gateways** > **Gateway list** press the button **+Add** and select **Aastra DECT** :
| Parameter | Description |
| --------------- | ---------------------------------------------------------------------------------- |
| OMM MAC Address | The MAC address of the master base. This is found on the back of the base station. |
| Name | Enter a name for this Base Station |
{% hint style="info" %}
Further configuration of the Aastra DECT gateway is no longer needed at this point, as the master assignment was already completed in the **OpenMobility Configurator**.
{% endhint %}
### Add Mobile DECT Handsets
Adding an Aastra / Mitel DECT handset is done under **Devices** > **Device list** in the PASCOM cloud phone system web UI, click the **+Add** button and select **aia Aastra Dect Gateway: handset**:
| Parameter | Description |
| --------------------- | --------------------------------------------------------------------------------------------------------------------------------------------------------------------------------------------------------------------------------------------------------------------------------------------------------------------------------------------------- |
| Connected to | Wählen Sie hier den DECT-Sender aus, der als Master definiert wurde |
| Subscribe via | Additional ID: the code required to manually add a mobile handset without the IPEI; IPEI: The IPEI number serves as a unique handset identifyer |
| Login / Additional ID | An additional ID code is generate here, should you have selected the **Subscribe via** option **Additional ID** |
| IPEI | Enter the mobile handset's IPEI number should you selected the **Subscribe via** option **IPEI**. The IPEI number can be found on the back of the handset, however you will need to remove the battery as the sticker with the IPEI is placed under the battery. Alternatively, you can also find the IPEI number via the Info menu on the handset. |
Finally, you can assign the DECT handset to a [User (or location)](/en/setup/user/user.md).
### Configuring the OMM
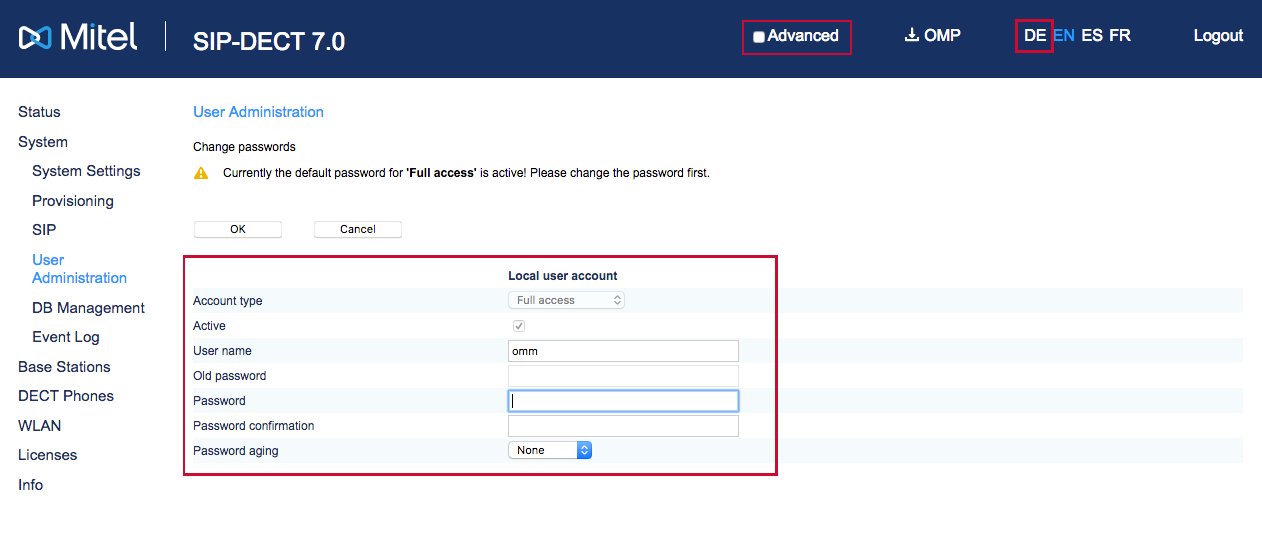
Go to the IP adress of the OMM and log into the web UI using the username and password **omm**. Complete the following setting configurations:
* Change passwords.
* Select language: **EN**
* Activate the advanced settings be checking the **Advanced** checkbox next to the language setting
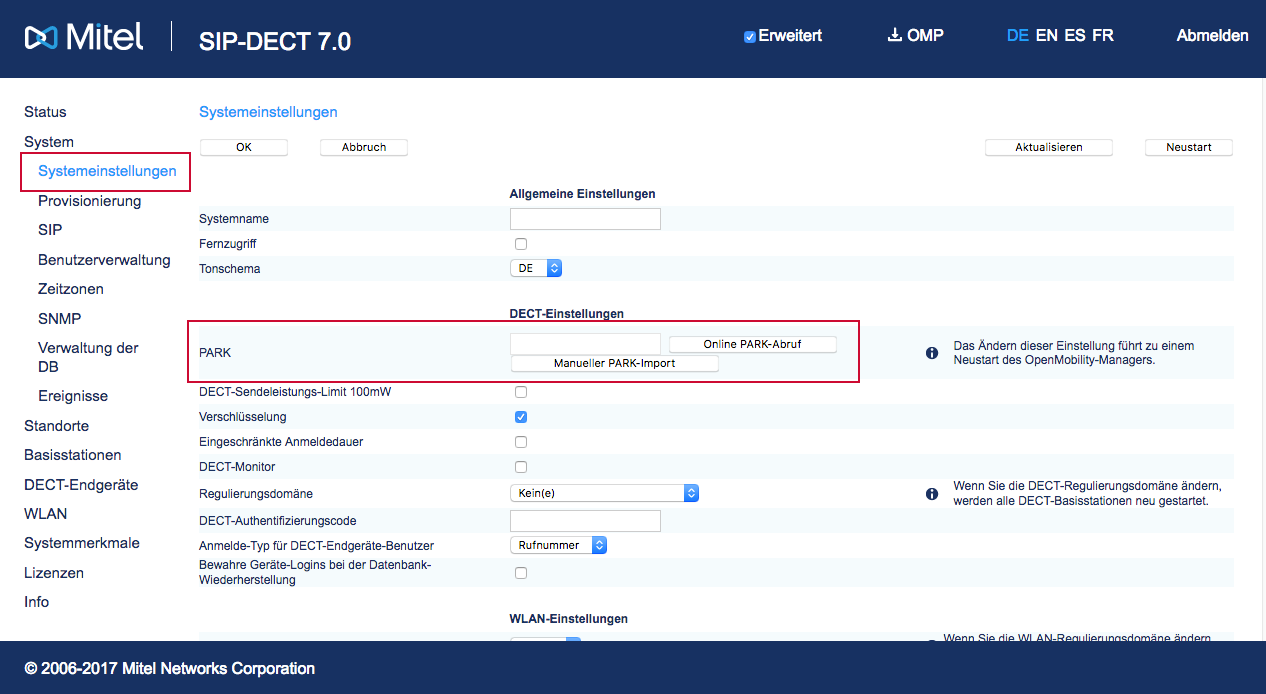
* **System > System Settings** enter the PARK ID which is printed on the Aastra CD delivered with the system or the PARK as generated via the **Online PARK manager**. Please note, at this point the DECT sender must be able to establish an internet connection.
* Update the time settings
* Save. The system will now reboot.
Finally, the following steps are now required:
Select the Master DECT send from the list under **Gateways** > **Gateway list** within the PASCOM cloud phone system web UI and by pressing the **Acton** button selection the option **Provisioning URL**. Copy the relevant provisionings path as this will be required in the next steps.
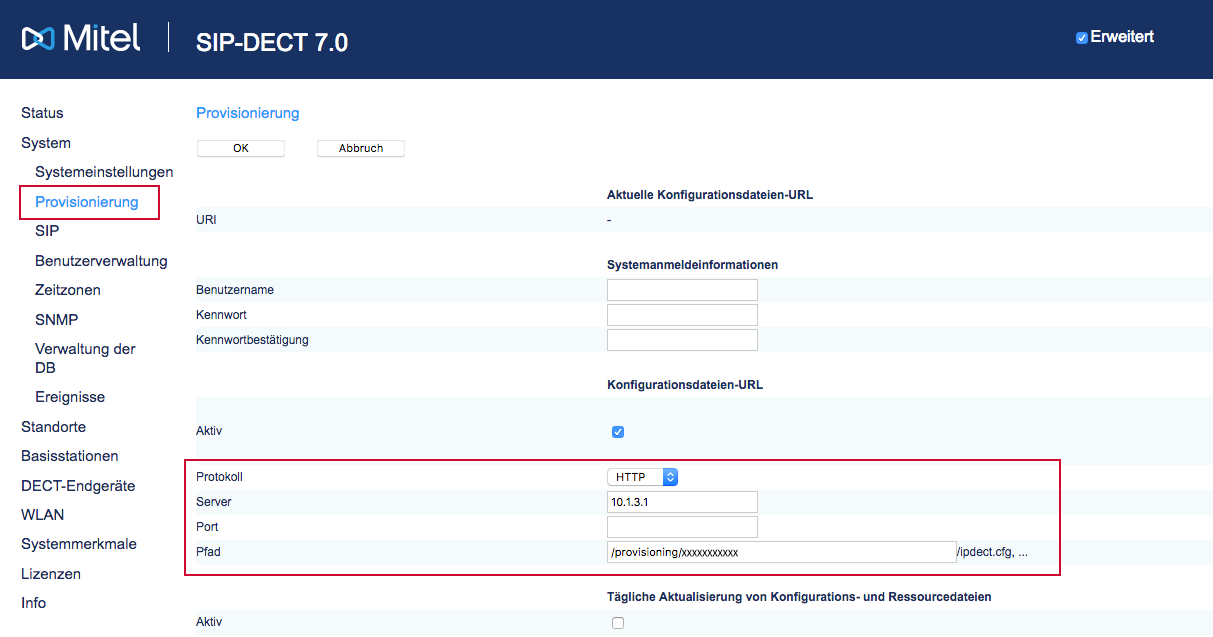
Go to the Master DECT sender web UI and log in. In the **Server** field under **System** > **Provisioning**, enter the PASCOM cloud phone system IP address and under **Path** now paste the previously copied provisioning URL. Please ensure that the correct **Protocol** (HTTP or HTTPS) has been selected.
Confirm the settings by pressing **OK**
### Import the Mobile Handset Configuration into the OMM
Instead of manually adding each individual handet to the OMM, simply download the necessary configuration file from the PASCOM web UI:
Under **Gateways** > **Gateway list** select the Aastra DECT sender that you have defined as Master and press **Edit**. Under the **Configuration Files** you will find a download link to the required mobile handset configuration sets. The mobile handset configuration contains all added handsets and can be imported to the OMM under the menu option **DECT devices**.
Since **Firmware 8.3SP4** Mitel introduces a new mandatory column **User/Device Relation** in the CSV import file for the handsets. We have included this new column in the CSV configuration file we generated. When importing new handsets, you must either upgrade to the new firmware or remove the column.
If you want to import the DECT handset configurations via CSV file into a Mitel with **firmware 8.3SP3** or older, Download the handset configuration from the Mitel DECT Gateway details. Example content:
```
#Number/SIP user name;Display name;User/Device relation;PIN / Login PW;IPEI;DECT Authentication Code;Login/Additional ID;Authentication user name;SIP authentication password;Description 1;Description 2;Key lock;Key lock PIN;Key lock timer;SOS number;Man Down number;Profile Id
9ZvPmAExTKt0916;User1;FIXED;;;;0916;9ZvPmAExTKt0916;t6W6dHPcgvYZ8Hd;;;;;;;;
TcJQt2QrU632442;User2;FIXED;;0358601632442;;;TcJQt2QrU632442;GuvFU6nWn9qUyHK;;;;;;;;
```
Remove the **"User/Device relation "** column and change the number of columns (16 vs. 13) accordingly. Add the **data\_sequence** block. It should look like the following:
```
##############################################################################
data_sequence
##############################################################################
9ZvPmAExTKt0916;User1;;;0916;9ZvPmAExTKt0916;t6W6dHPcgvYZ8Hd;;;;;;;
TcJQt2QrU632442;User2;;0358601632442;;TcJQt2QrU632442;GuvFU6nWn9qUyHK;;;;;;;
```
#### How to Import the Data:
Once you have clicked on the OMM configuration menu options **DECT phones** > **Import**, a new mask is opened in which you will need to proceed as follows:
1. Under **Import registration data** click on select file
2. Upload the configuration file
3. Click on Import
4. The RFP will now read and parse the file
A list will appear below containing all the entries (mobile handsets).
5. Select all the required entries
6. Now click **Add**
The entries will now be imported.
{% hint style="warning" %}
Should you perform this import more than once, please only select the new devices under step 6 of the import, otherwise the import will encounter errors. Devices that are no longer deployed must be removed manually from the OMM configuration UI.
{% endhint %}
### Connect Mobile Handsets to the DECt System
Depending on which subscription option you chose when adding the mobile handsets, there are two options to connect your DECT handsets to the DECT system.
#### Additional ID
1. Make a note of the **Handset Registration PIN** found in the Master DECT sender settings under **Gateways** > **Gateway list** in the PASCOM web UI.
2. Make a note of the **Additional ID** found in the mobile handset settings menu under **Devices** > **Device list** in the PASCOM web UI.
3. Press the handset's menu key and select **System** > **New System**
4. Now enter the previously noted registration PIN, the letter **R** and then the additional ID before confirming the settings by pressing **Register**, after which the mobile handset will automatically connect to the DECT sender.
Example:
```
12345R0987
```
#### IPEI
1. Make a note of the **Handset Registration PIN** found in the Master DECT sender settings under **Gateways** > **Gateway list** in the PASCOM web UI.
2. Press the handset's menu key and select **System** > **New System**
3. As the access code, enter the handset's registration PIN
4. Confirm your setup by pressing **Register**, after which the mobile handset will automatically connect to the DECT sender.
---
# Agent Instructions
This documentation is published with GitBook. GitBook is the documentation platform designed so that both humans and AI agents can read, navigate, and reason over technical content effectively. Learn more at gitbook.com.
## Querying This Documentation
If you need additional information that is not directly available in this page, you can query the documentation dynamically by asking a question.
Perform an HTTP GET request on the following URL with the `ask` and `goal` query parameters:
```
GET https://docs.pascom.net/en/setup/endpoints/mitel-dect.md?ask=&goal=
```
`ask` is the immediate question: it should be specific, self-contained, and written in natural language.
`goal` is what the user is ultimately trying to achieve, the reason they need the answer. Sharing it helps GitBook give you a better, more relevant answer. A goal is most helpful when it describes the outcome the user wants rather than restating the question. For example, with `ask=how do I create an API token`, a goal like `build a script that syncs our docs to a CMS` lets GitBook tailor the answer to that use case.
The response will contain a direct answer to the question and relevant excerpts and sources from the documentation.
Use this mechanism when the answer is not explicitly present in the current page, you need clarification or additional context, or you want to retrieve related documentation sections.