> For the complete documentation index, see [llms.txt](https://docs.pascom.net/llms.txt). Markdown versions of documentation pages are available by appending `.md` to page URLs; this page is available as [Markdown](https://docs.pascom.net/en/setup/endpoints/fanvil.md).
# Fanvil Desk Phones
Integrate your Fanvil IP desk phones into the PASCOM Cloud PBX

## Supported Devices
{% hint style="warning" %}
Fanvil desk phones are primarily used in hotels, nursing homes and similar facilities. Therefore, they do not offer the full range of functions in the PASCOM Cloud PBX.
{% endhint %}
| Models | Description |
| ----------------------------------- | ----------- |
| Fanvil V65 | |
| Fanvil X210-V2 | |
| Fanvil W611W (Linkvil WiFi handset) | |
| Fanvil H6W | |
| Fanvil H1-2 Wire | |
| Fanvil V66 Pro | |
| Fanvil H4W | |
| Provisioning | Firmware Management | Remote control via Desktop App | PASCOM Menu |
| ------------ | ------------------- | ------------------------------ | ----------- |
| yes | no | no | no |
**Provisioning**: The IP phone is managed via PASCOM.\
**Firmware Management**: The firmware *cannot* be updated via PASCOM.\
**Remote control via Desktop App**: Calls *cannot* be started via the Desktop App.\
**PASCOM Menu**: *No* PASCOM menu is stored on a button on the phone.
{% hint style="info" %}
As there are a variety of firmwares for the different IP phones, it is unfortunately not possible for us to test each one, so it may be that some firmware versions do not support PASCOM functions.
{% endhint %}
## Provisioning
PASCOM is able to automatically and centrally configure IP phones from the manufacturer Fanvil. This process is called provisioning. For this purpose, PASCOM provides a basic configuration (**Endpoints** > **Basic Configurations**). This is sufficiently pre-parameterized and only needs to be adapted in some cases.
## Add new phone
### 1. Determine MAC address
The MAC address is on the back of the phone.
Alternatively, the MAC address is often found on the product packaging.
### 2. Create endpoint
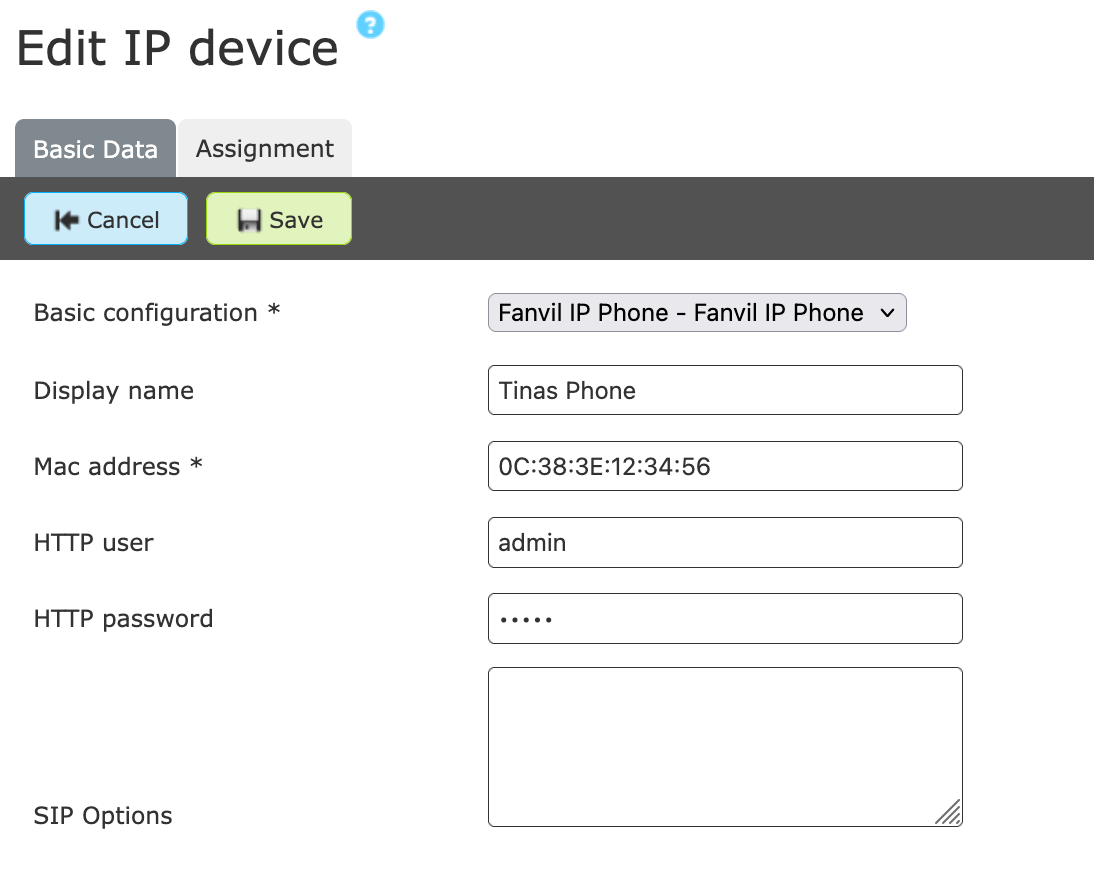
Log in to your PASCOM PBX and add a new device of type **Fanvil Desk Phone** under **Devices** > **Endpoints**.

Select a **display name** for the phone, e.g. Mrs. Müller - Central.
Enter the previously determined MAC address of the phone in the **MAC address** field.
For security reasons, use your own **HTTP user** and **HTTP password** data for the phone. The manufacturer's default data will be overwritten during provisioning.
If you want to provision many endpoints, you can globally set your own **HTTP password** for all provisionings in the system settings.
### 3. Assign user
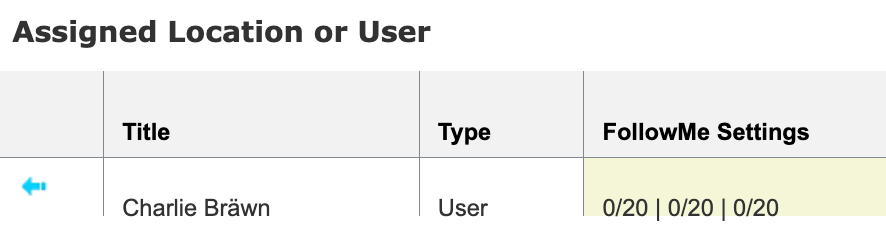
Next, you can assign a user or workstation to the IP phone. In the **Assignment** tab, a [user (or workstation)](/en/setup/user/user-concept.md) can be assigned to the phone.
Finally, click on **Save**
### 4. Apply jobs
After saving changes, a corresponding entry to apply the jobs appears in the menu bar (top). Start the job by clicking on the **green check mark**. The phone is now completely set up.
### 5. Connect phone
Connect the IP phone to the network. The phone contains a built-in switch, use the Ethernet port labeled **NET**. If you are not using **PoE** (Power over Ethernet), connect the phone to mains power.
**Is the phone already connected to your network?** - Restart the phone.
{% hint style="success" %}
If the phone is not brand new, you should always reset it to **factory settings**. To do this, turn on the phone, press the \*\*\*\* + ##\*\* buttons on the home screen and then hold down the \*\*\* + #\*\* buttons until the phone restarts. Finally, confirm the factory reset by pressing **1**.
{% endhint %}
Once the phone has been successfully registered for your user, test the telephony.
### 6. Test function
The easiest way to test the successful commissioning is to call your own voicemail box with **\*100**. The announcement of your voicemail box should then be heard.
## Accessing the Fanvil web interface
To access the web interface of your IP phone, you need the IP address. The following describes ways to find it:
### Display IP address on the phone
Press the **OK** or **Menu** button on the phone and navigate to **Status** or **Network Status**. The IP address will be displayed there.
### Determine IP address via the device list
Log in to the PASCOM web UI. Click on **Endpoints** > **Device List**. You will now see an overview of all available devices. To the left of each entry you will find an *Info* symbol. Click on it to get an overview of the provisioned phone, including the IP address.
### Admin rights
To have access to some menu items in the web UI of the Fanvil phone, you need admin rights. The default login data are:
* **Username:** `admin`
* **Password:** `admin`
After logging in, you can adjust the settings.
## Basic Configuration
As already mentioned, Fanvil IP phones are provisioned with the help of the basic configuration. The basic configuration can be found under **Devices** > **Provisioning**.
{% hint style="info" %}
Before changing the basic configuration, you must **Duplicate** it.
{% endhint %}
You can also **Set as default** an already edited basic configuration. This way, newly created IP phones automatically receive the adapted basic configuration.
### Assigning a basic configuration
A basic configuration can be assigned in several ways:
* Via **Devices** > **Provisioning** > Select and edit basic configuration, in the **Assignment** tab, several IP phones can be added at once.
* Via **Devices** > **Endpoints** > Select and edit IP phone in the **Basic Data** tab you can change the basic configuration.
---
# Agent Instructions
This documentation is published with GitBook. GitBook is the documentation platform designed so that both humans and AI agents can read, navigate, and reason over technical content effectively. Learn more at gitbook.com.
## Querying This Documentation
If you need additional information that is not directly available in this page, you can query the documentation dynamically by asking a question.
Perform an HTTP GET request on the following URL with the `ask` and `goal` query parameters:
```
GET https://docs.pascom.net/en/setup/endpoints/fanvil.md?ask=&goal=
```
`ask` is the immediate question: it should be specific, self-contained, and written in natural language.
`goal` is what the user is ultimately trying to achieve, the reason they need the answer. Sharing it helps GitBook give you a better, more relevant answer. A goal is most helpful when it describes the outcome the user wants rather than restating the question. For example, with `ask=how do I create an API token`, a goal like `build a script that syncs our docs to a CMS` lets GitBook tailor the answer to that use case.
The response will contain a direct answer to the question and relevant excerpts and sources from the documentation.
Use this mechanism when the answer is not explicitly present in the current page, you need clarification or additional context, or you want to retrieve related documentation sections.