> For the complete documentation index, see [llms.txt](https://docs.pascom.net/llms.txt). Markdown versions of documentation pages are available by appending `.md` to page URLs; this page is available as [Markdown](https://docs.pascom.net/en/reference/howto/tomedo-setup.md).
# Setting up tomedo® Integration
This guide shows you how to set up the tomedo® integration on the PASCOM cloud phone system.
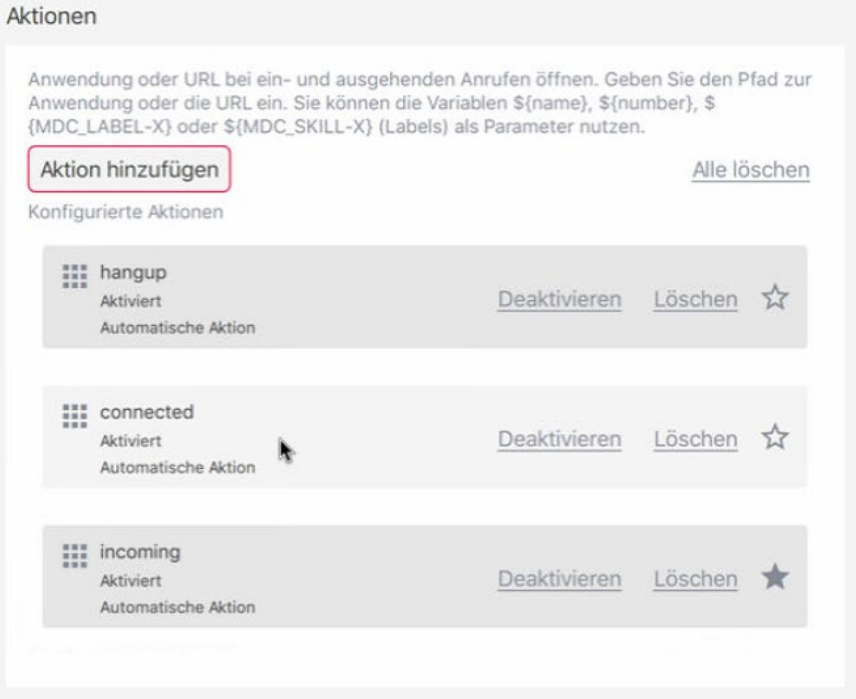
Telephony from tomedo® is configured in the PASCOM app. To do this, go to the **App Settings** and click on **Actions**.
### Setting up New Actions
Three actions are required for the tomedo® integration. A separate action is required for each **event type** (**incoming** / **connected** / **hangup**).
1. Action | **incoming**
2. Action | **connected**
3. Action | **hangup**
1. Click on **Add Action** to create a new action. Select the action type **Add App Action**.
#### Action for Incoming Calls
1. **Name:** - Assign a name for the action, e.g. `incoming`.
2. **App Path:** - Set the path to `/usr/bin/curl`.
3. **App Parameter:** - Set the URL for the parameters `http://localhost:9090/incoming/${number}`.
4. **Automatically Execute Action:** - Enable all `Call Types`.
5. **Call Direction:** - Incoming and outgoing = `Both`.
6. **Event:** - `On Ringing`.
#### Action for Active / Answered Call
1. **Name:** - Assign a name for the action, e.g. `connected`.
2. **App Path:** - Set the path to `/usr/bin/curl`.
3. **App Parameter:** - Set the URL for the parameters `http://localhost:9090/connected/${number}`.
4. **Automatically Execute Action:** - Enable all `Call Types`.
5. **Call Direction:** - Incoming and outgoing = `Both`.
6. **Event:** - `On Answer`.
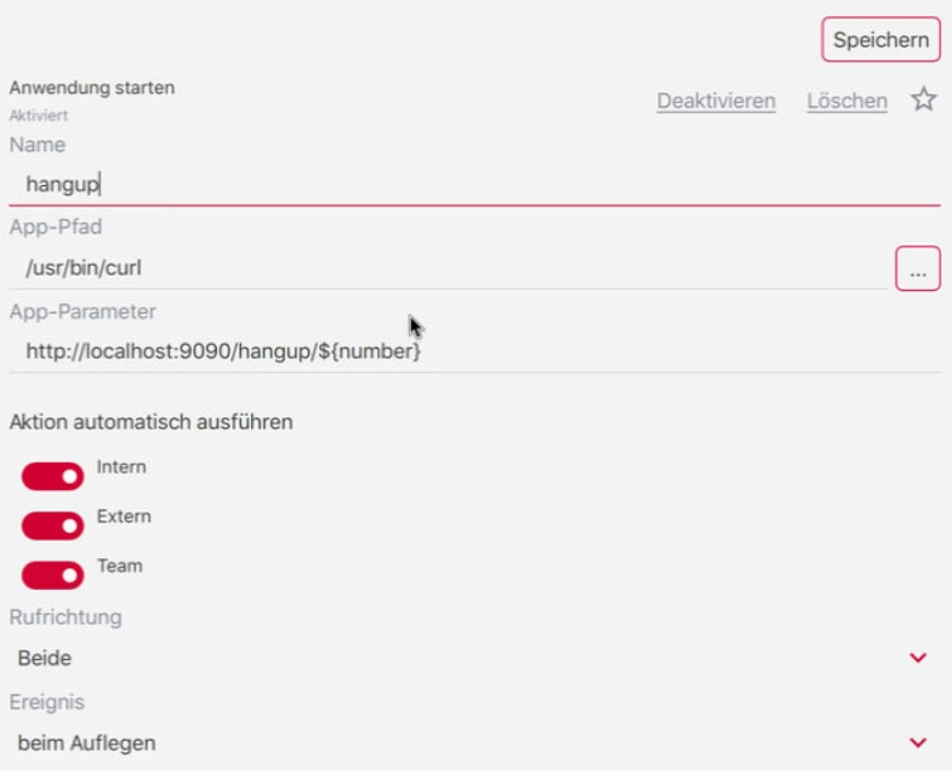
#### Action for Hangup
1. **Name:** - Assign a name for the action = `hangup`.
2. **App Path:** - Set the path = `/usr/bin/curl`.
3. **App Parameter:** - Set the URL for the parameters = `http://localhost:9090/hangup/${number}`.
4. **Automatically Execute Action:** - Enable all `Call Types`.
5. **Call Direction:** - Incoming and outgoing = `Both`.
6. **Event:** - `On Hangup`.
## Setup in tomedo®
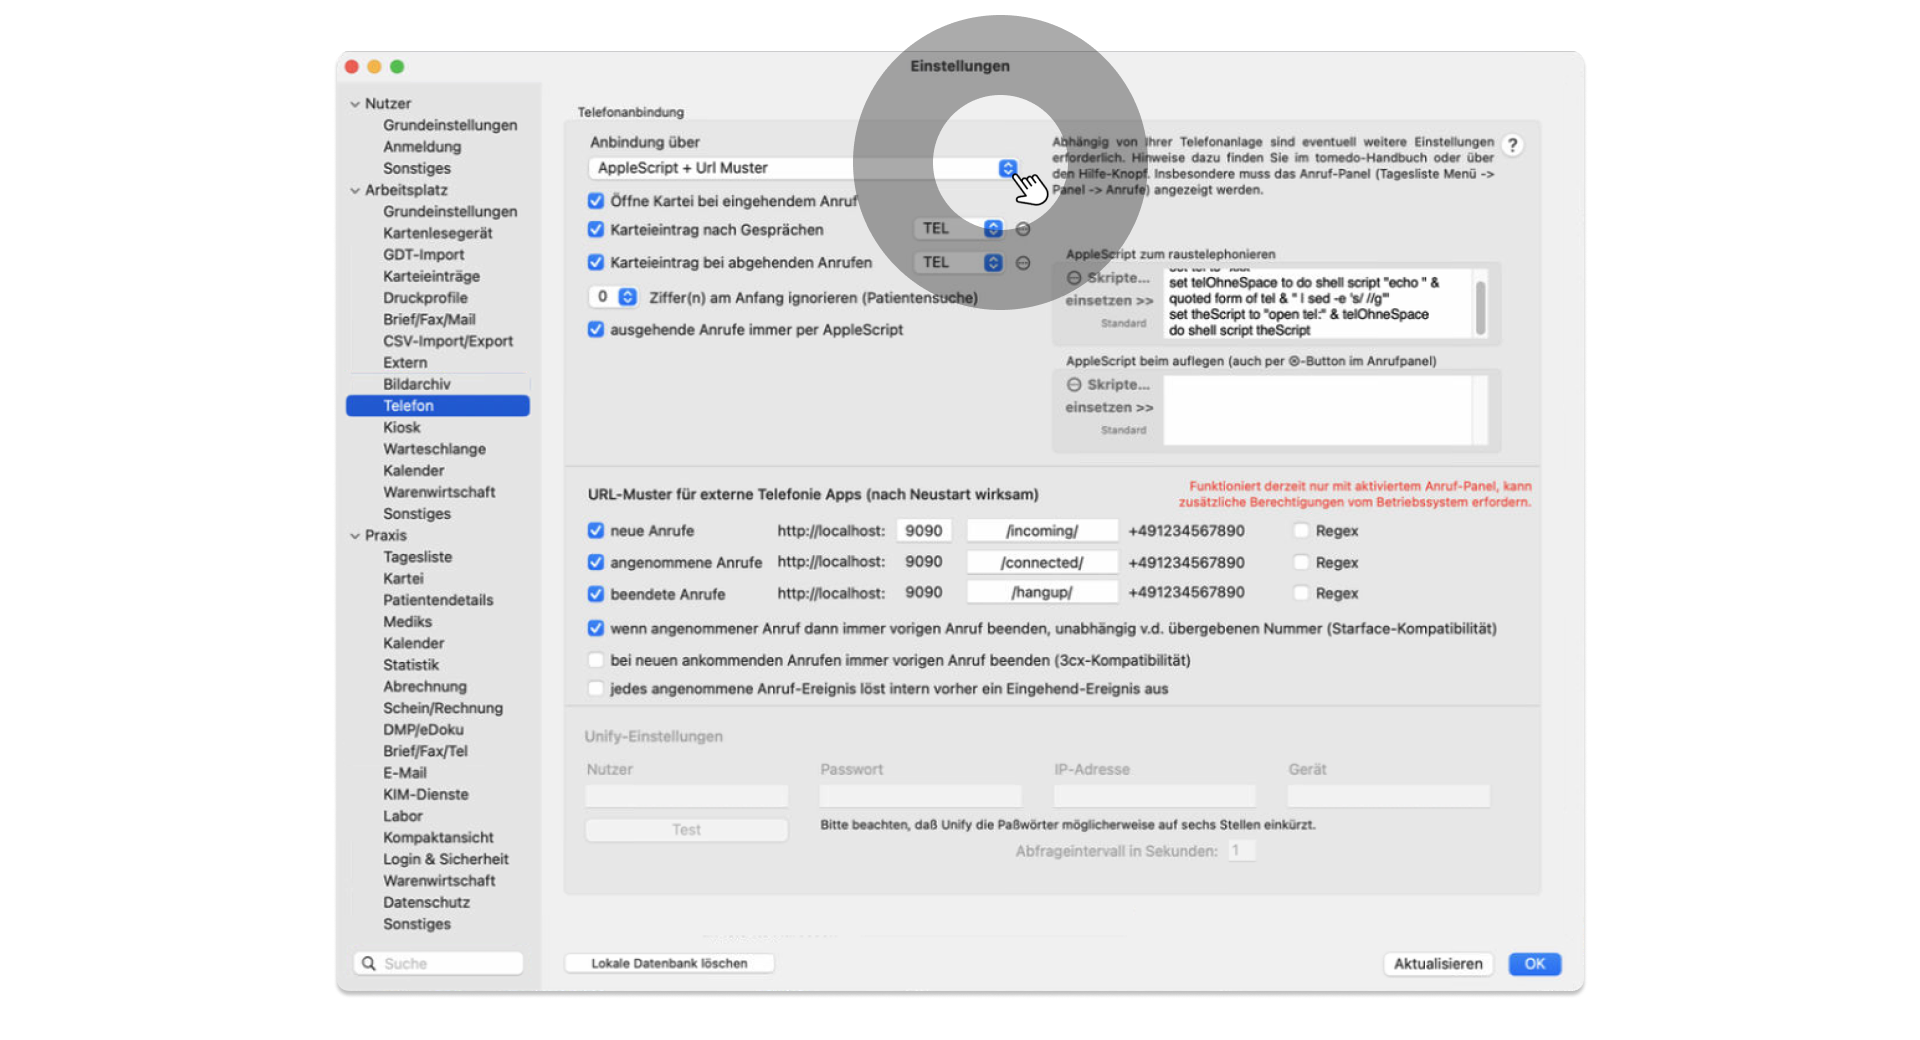
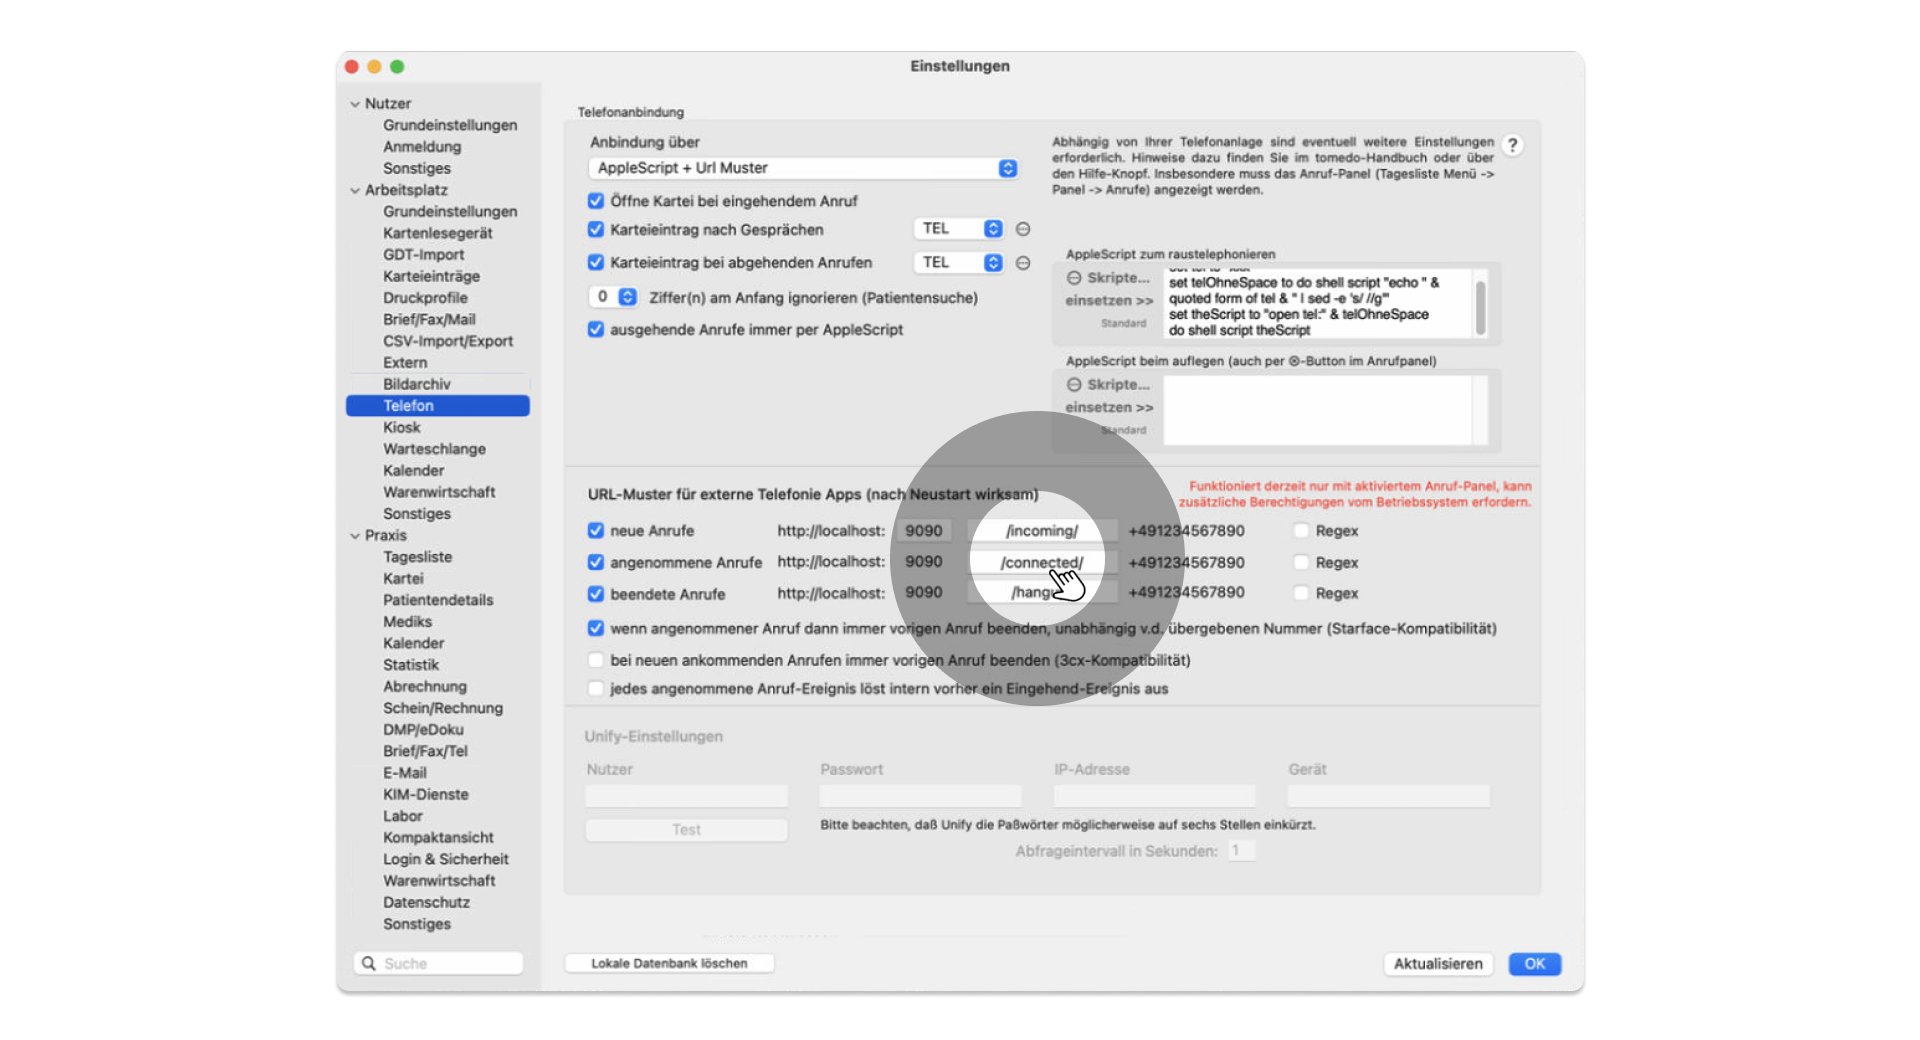
The three actions must be set identically in tomedo® and PASCOM in pairs. All three event switches (internal, external and team) must be activated for all three actions.
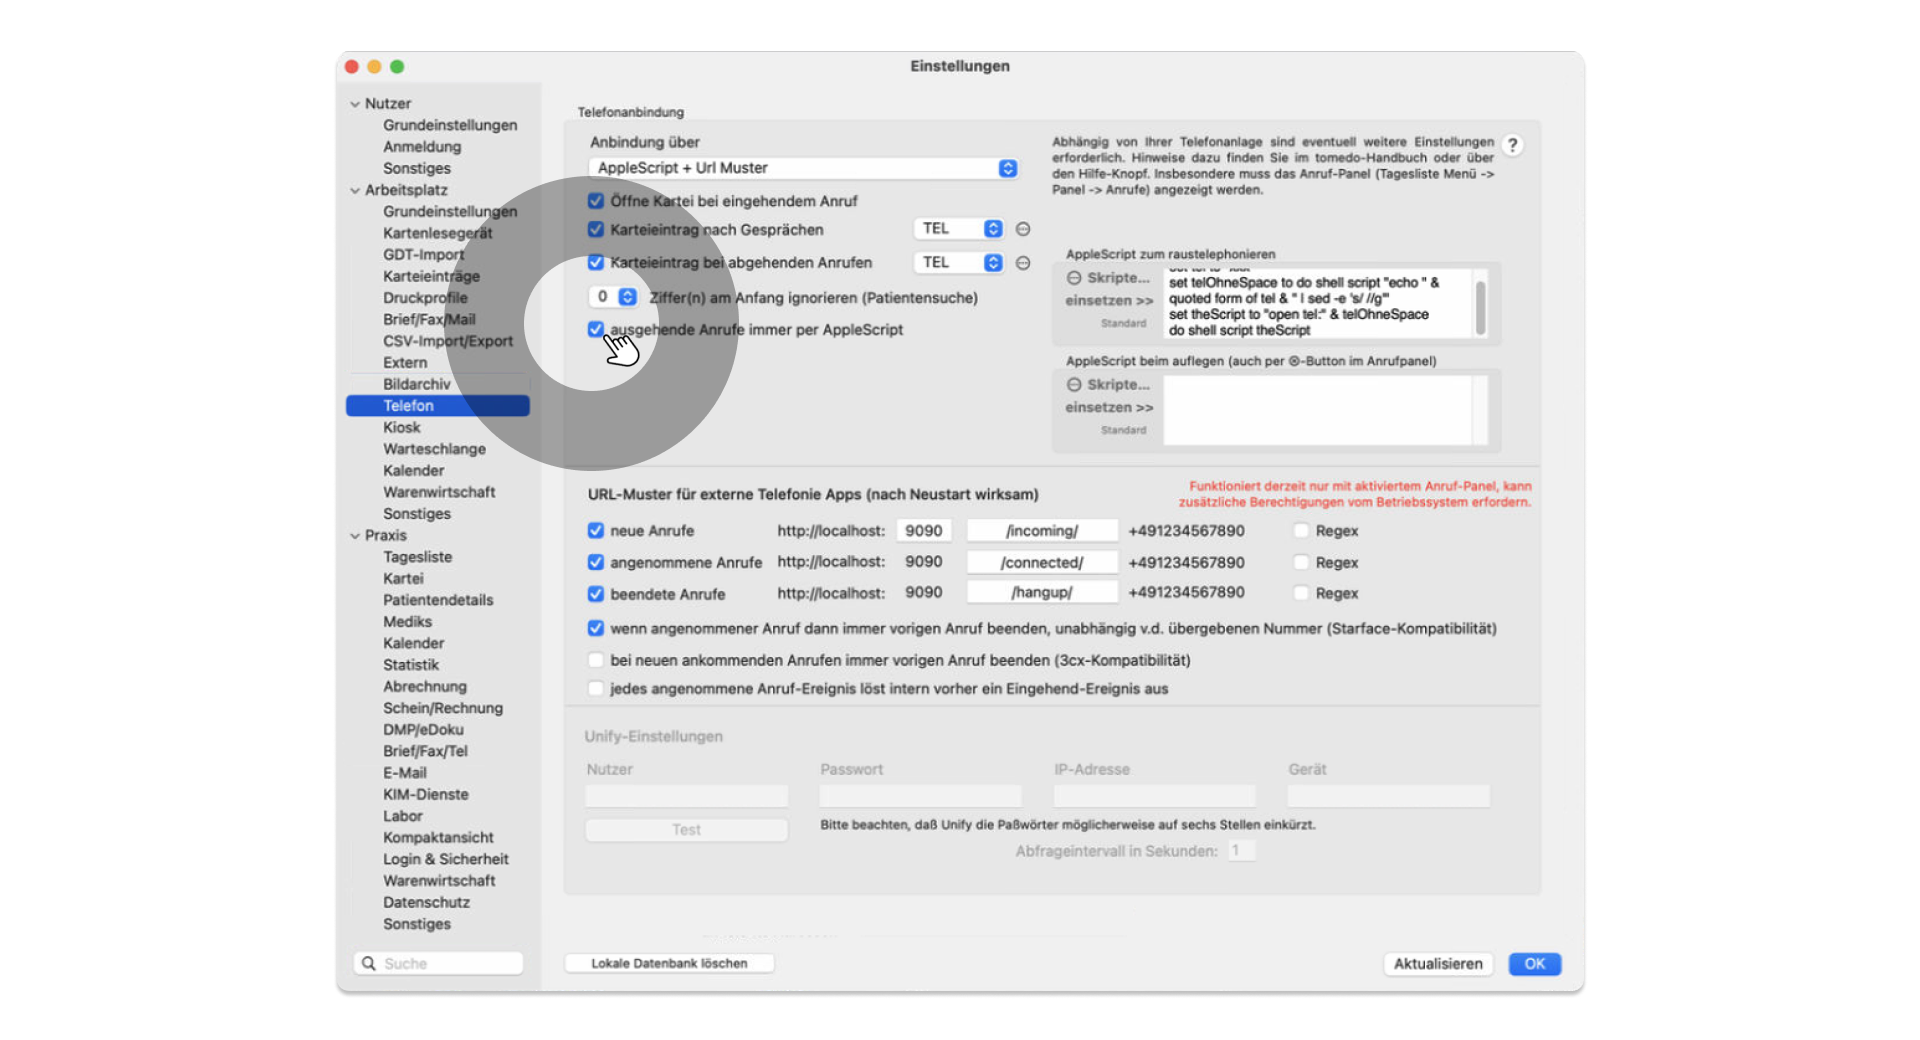
To do this, go to the **Settings** under **Workplace** and select **Phone**. There you set the **Telephone Connection** to **AppleScript + URL Pattern**.
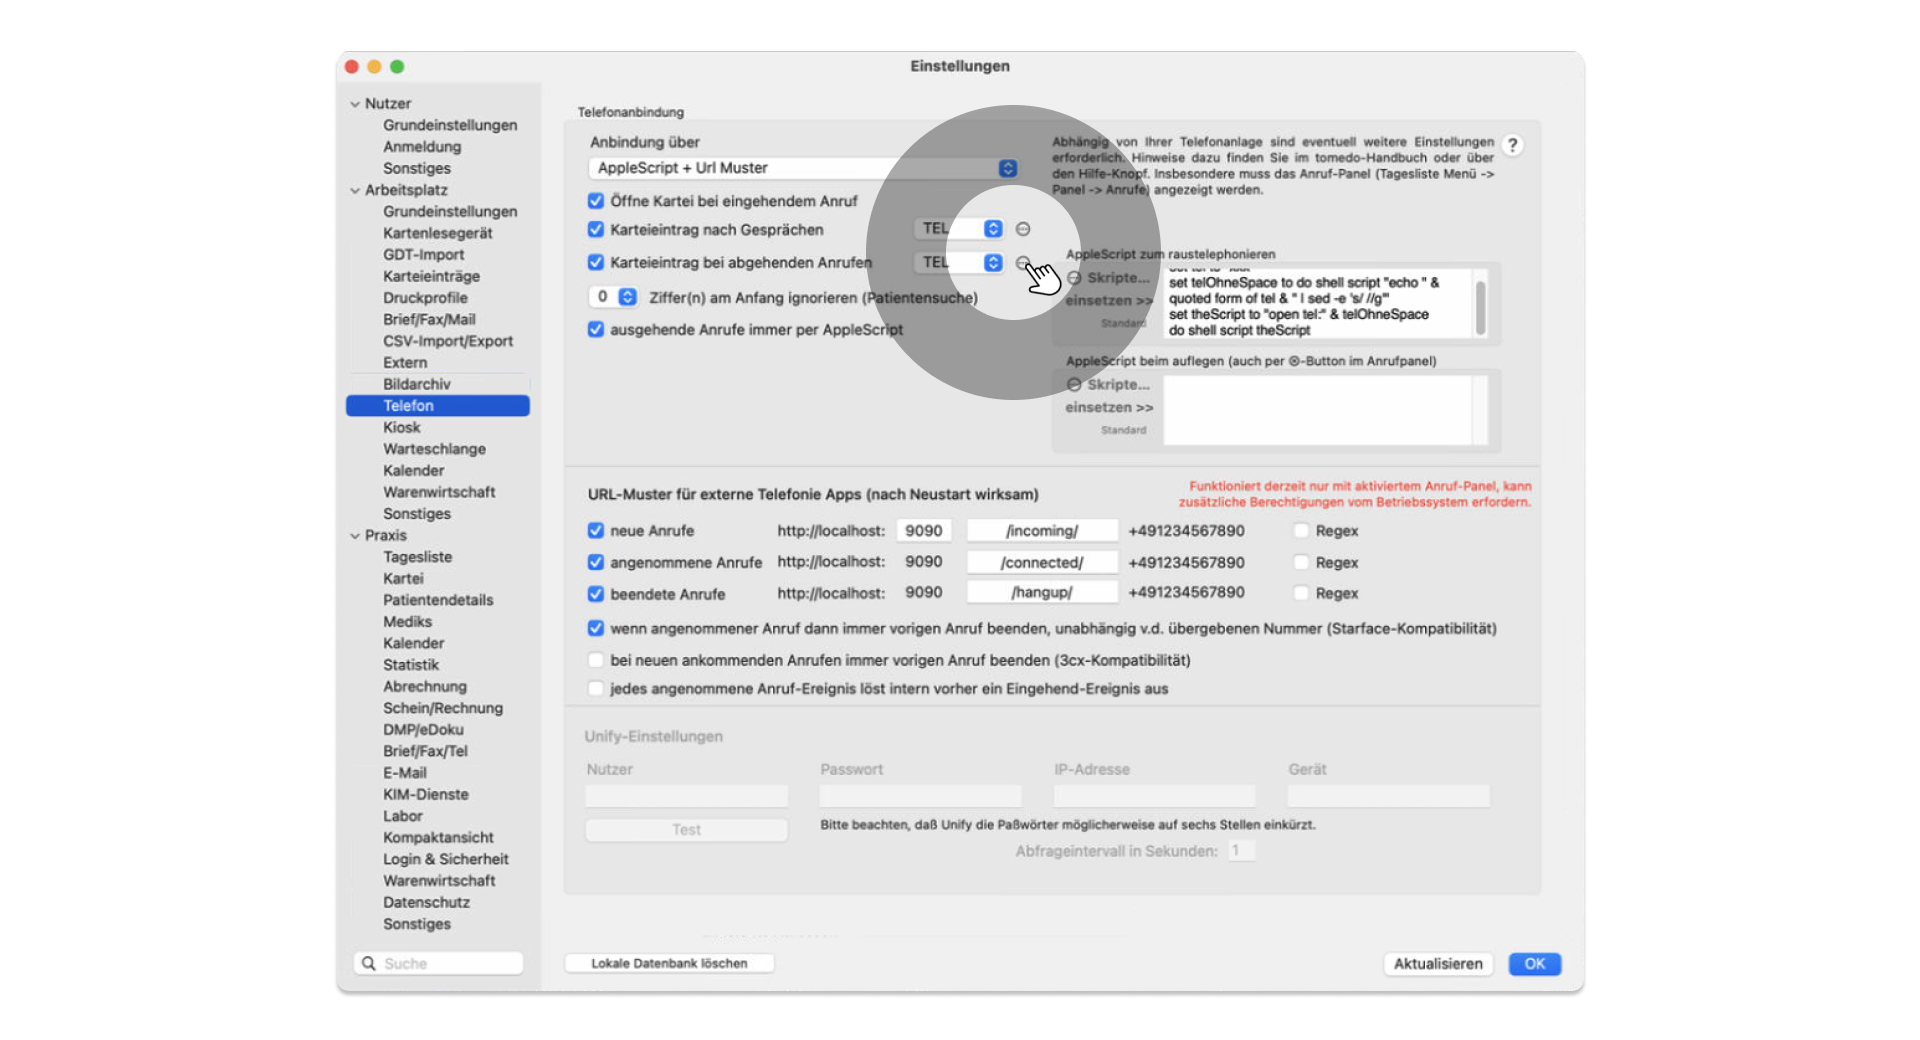
Create your own category for the patient file entry as in our example **TEL**.
**Activate** the setting **Always make outgoing calls via AppleScript**
Now set the **URL patterns** in the same way as the **PASCOM app actions**. These must be identical.
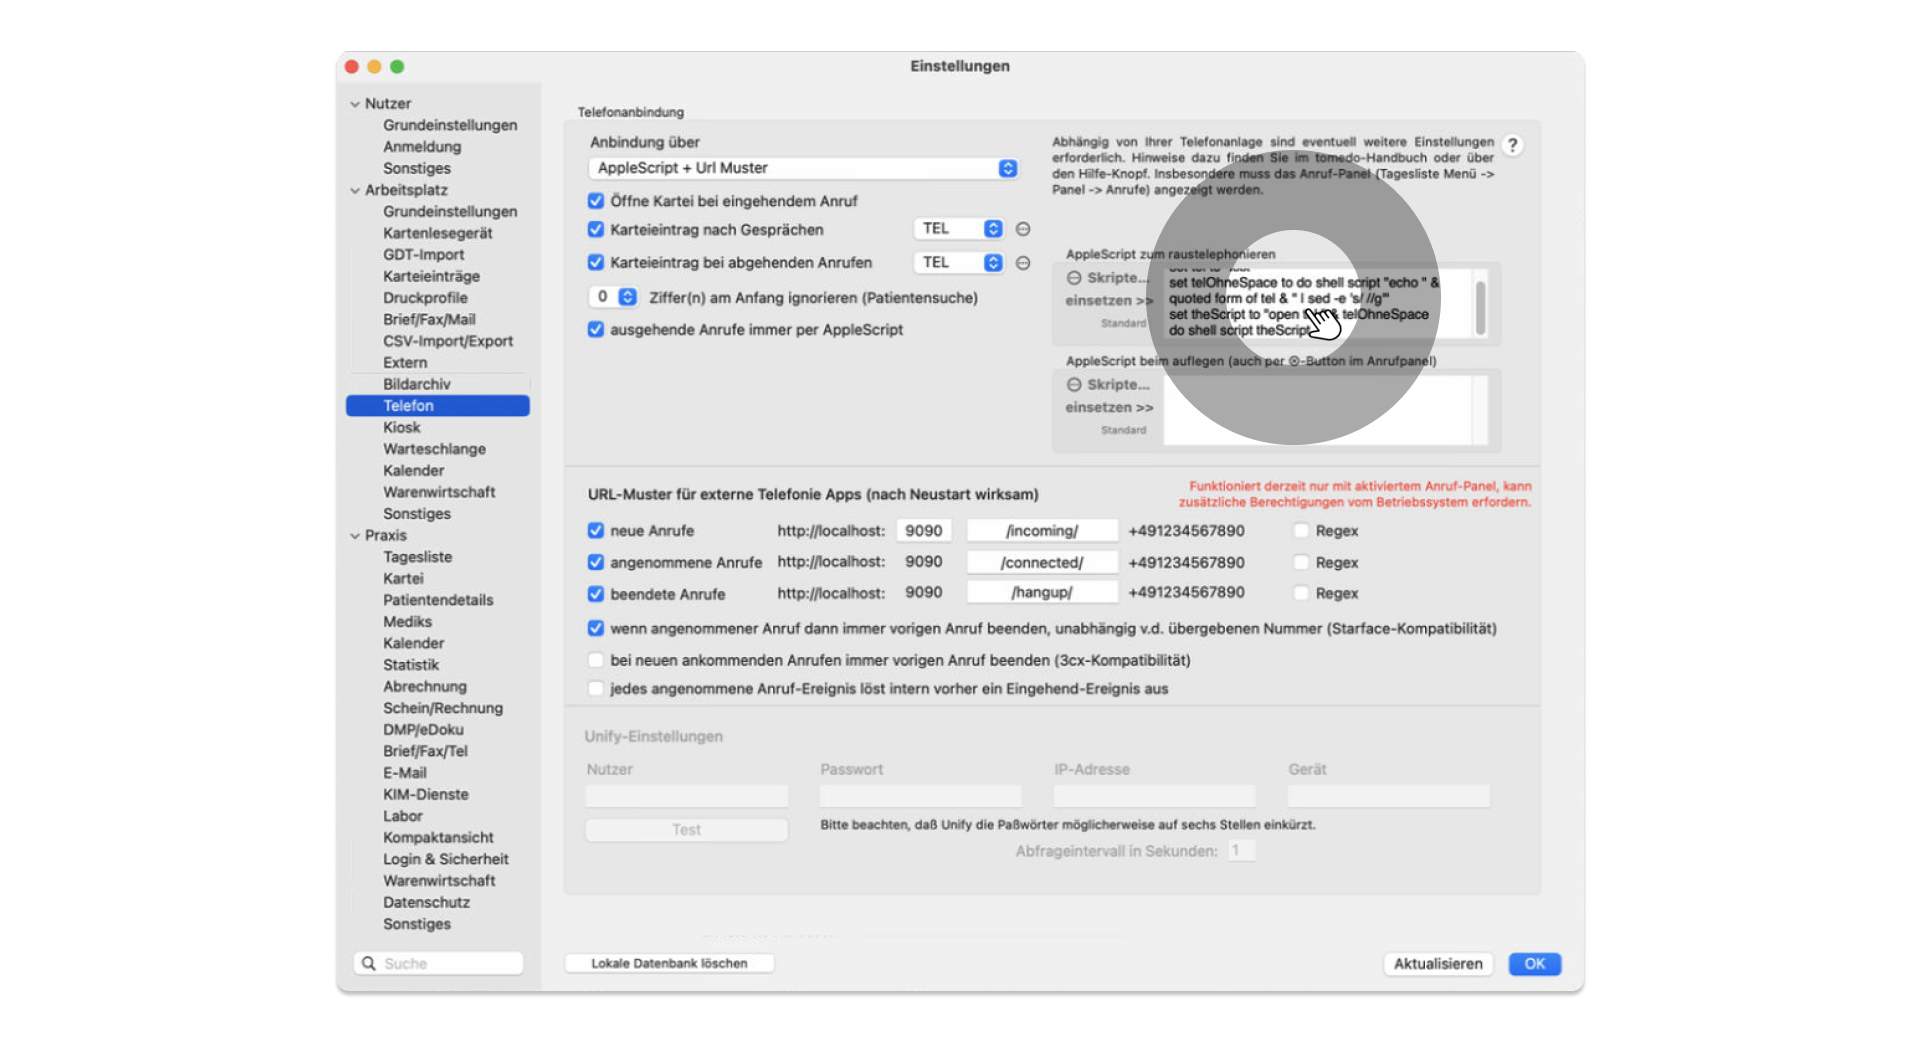
For outgoing telephony, tomedo® still needs an AppleScript that generates a URL call with the schema callto:, to which the PASCOM app then reacts and establishes an outgoing call.
**AppleScript**
```
set tel to "xxx"
set telOhneSpace to do shell script "echo " & quoted form of tel & " | sed -e 's/ //g'"
set theScript to "open tel:" & telOhneSpace
do shell script theScript
```
## Faxing from tomedo®
{% hint style="warning" %}
To use the tomedo® fax integration, you need a tomedo® version from 1.94.0.9.
{% endhint %}
The PASCOM cloud phone system enables fax documents to be sent directly from tomedo®. For this purpose, the fax integration uses the PASCOM REST interface.
### Setting up tomedo® Fax Integration
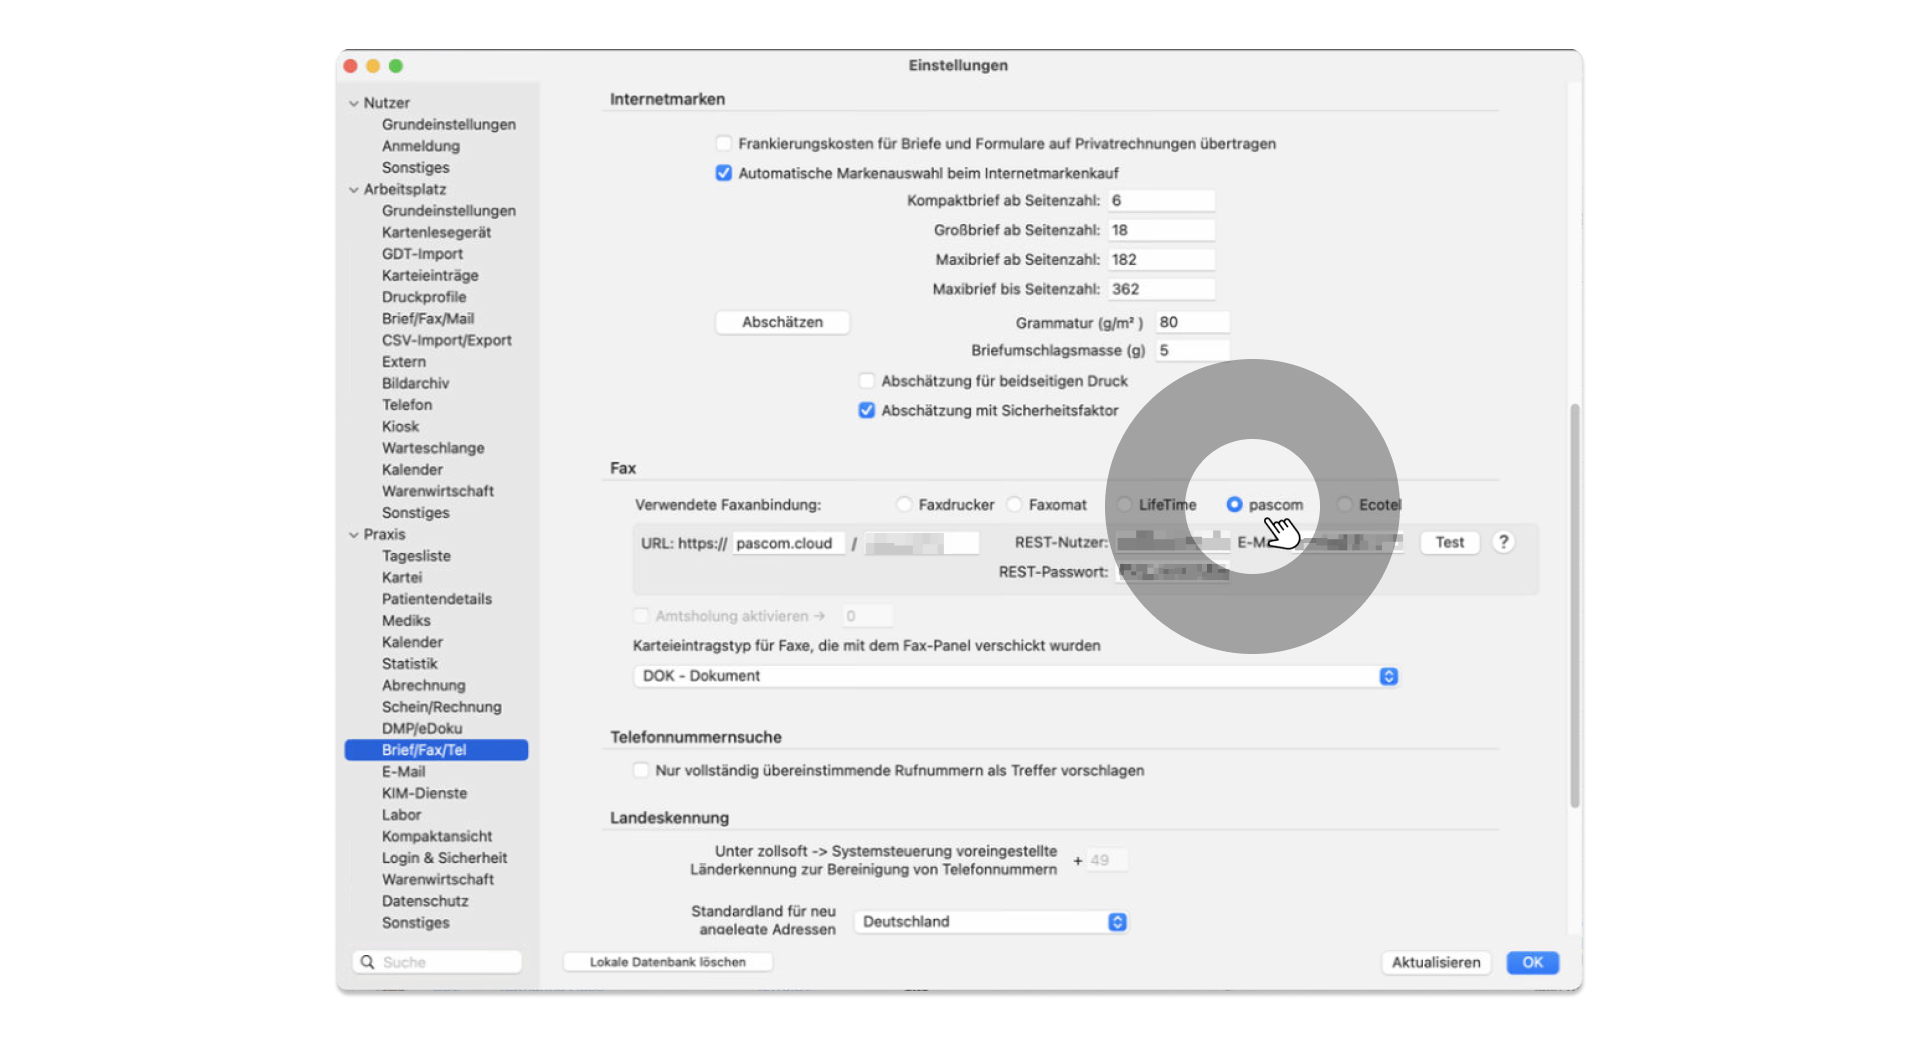
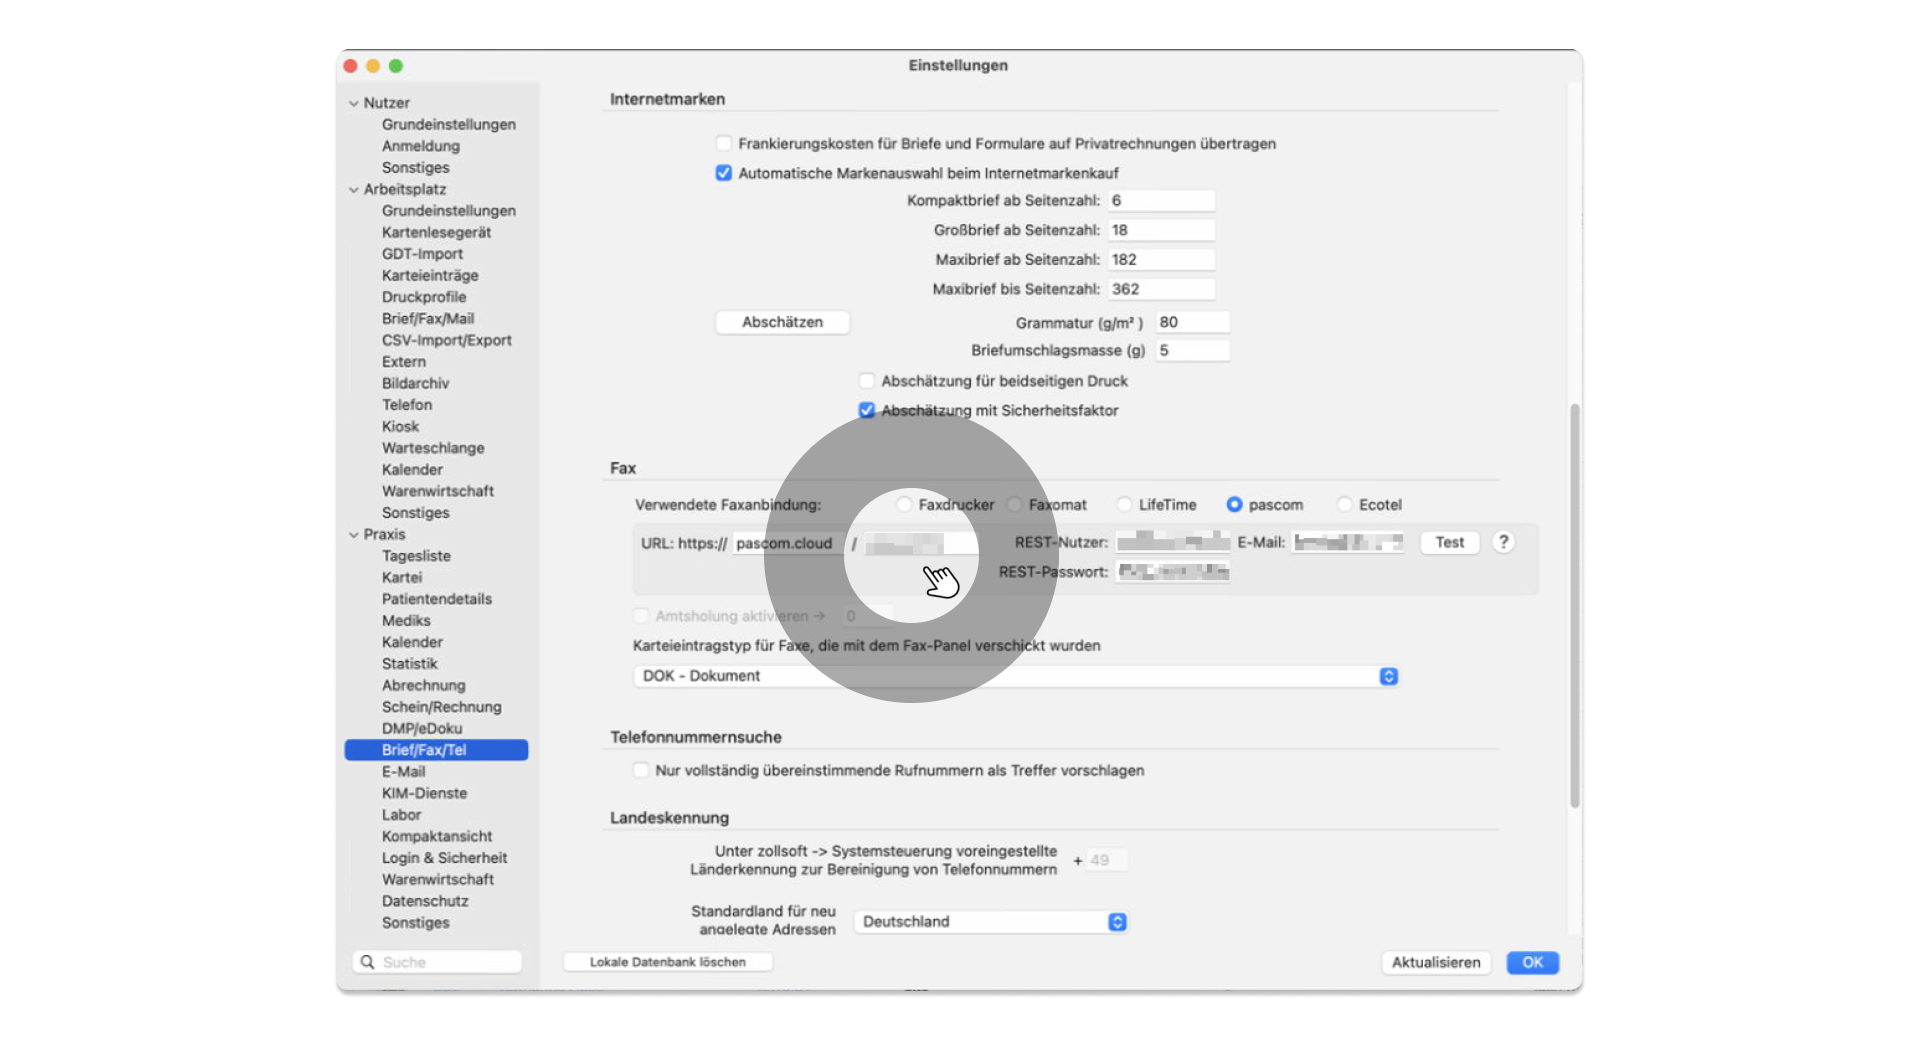
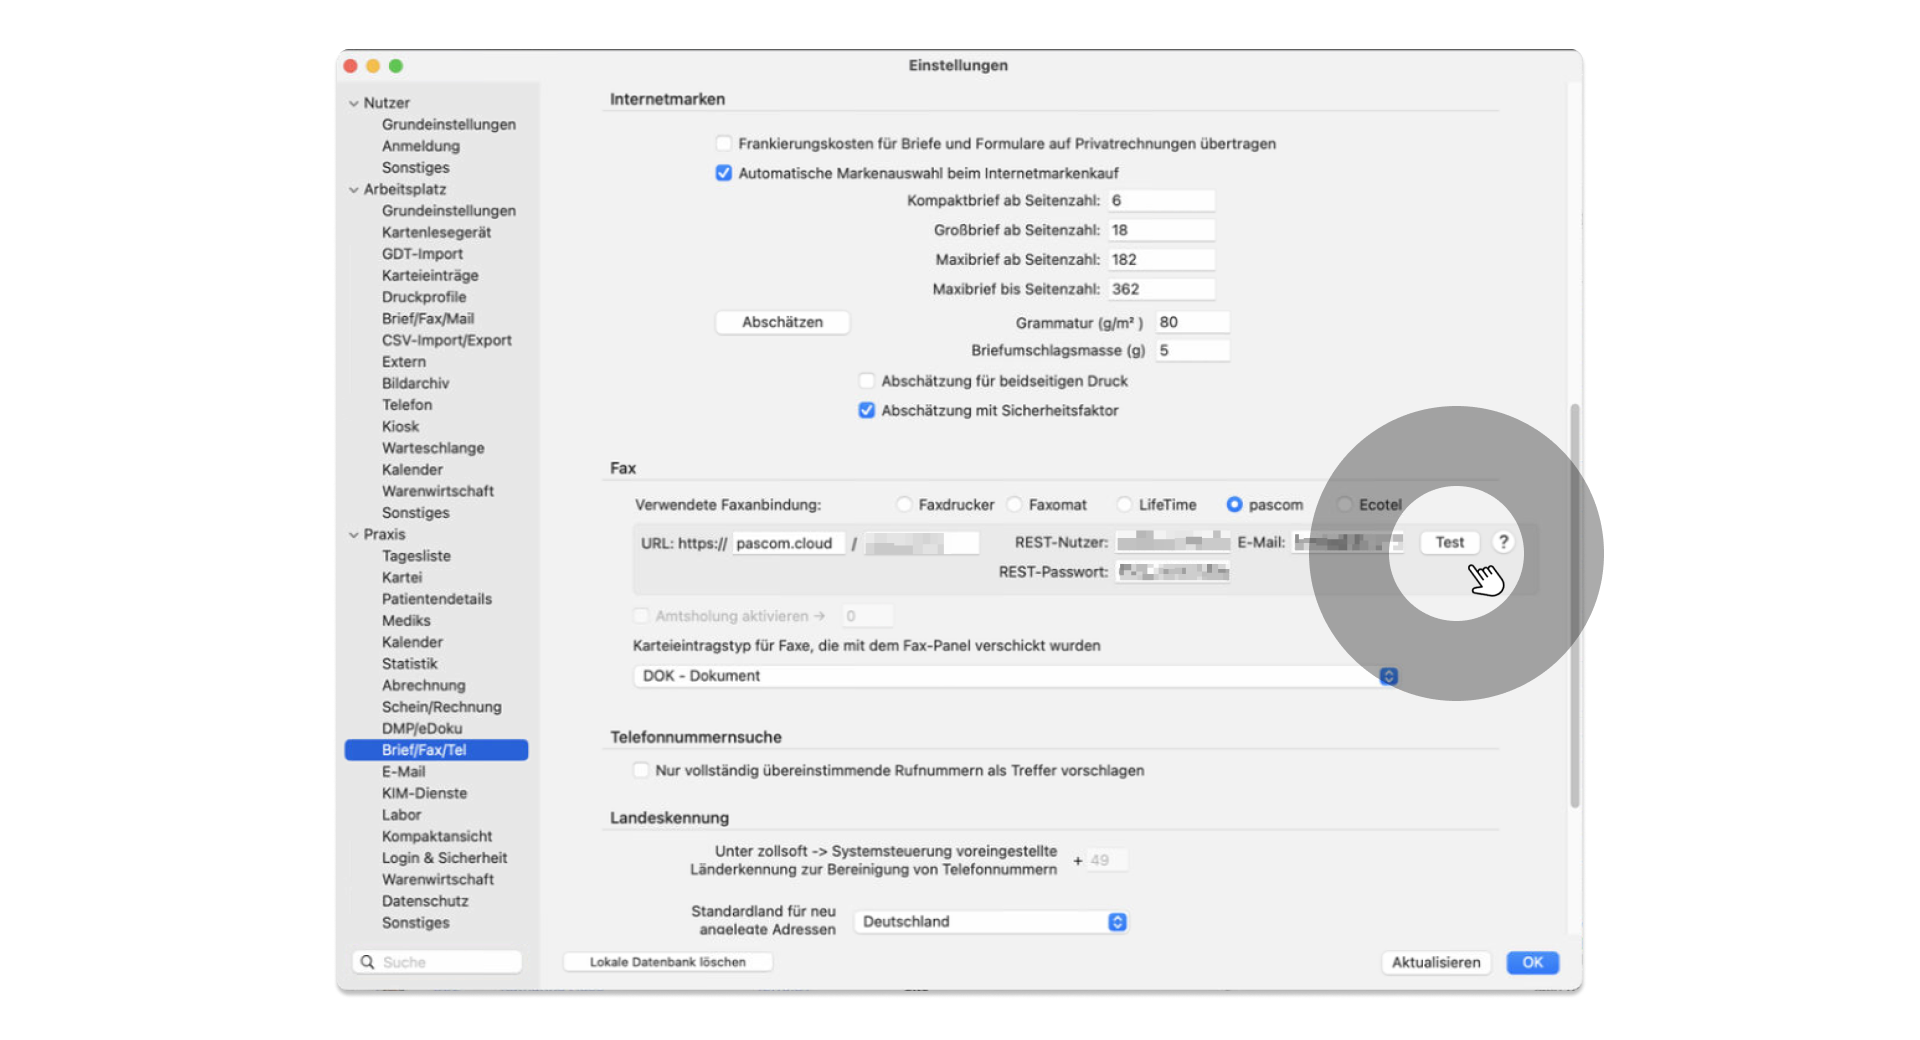
The fax settings in tomedo® can be found in the settings under **Letter/Fax/Tel** and must be switched to **pascom** here.
### Store URL
For faxing, tomedo® needs a URL that controls the PASCOM API.
1. The URL is identical to the address to reach your PASCOM cloud phone system.\
**Example:**
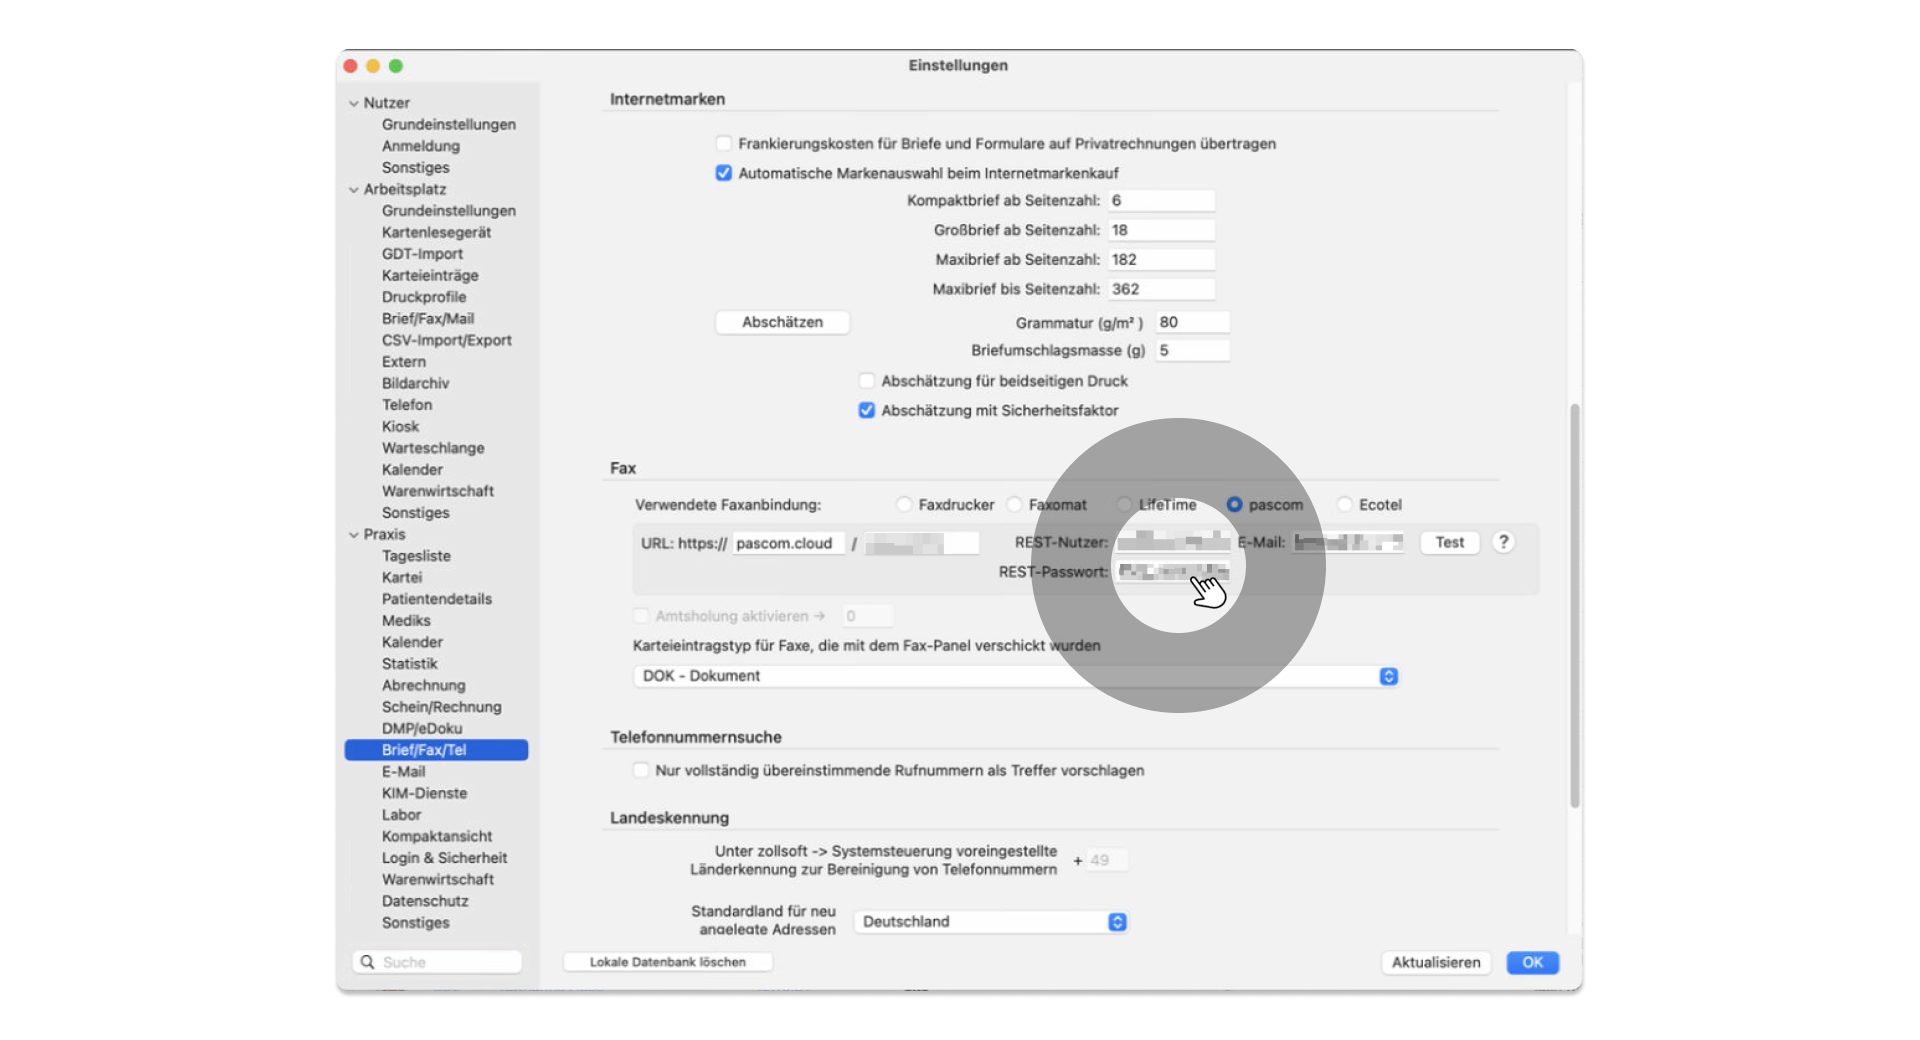
### Store REST - Username and Password
For the connection to the PASCOM API you need the REST password and the username.
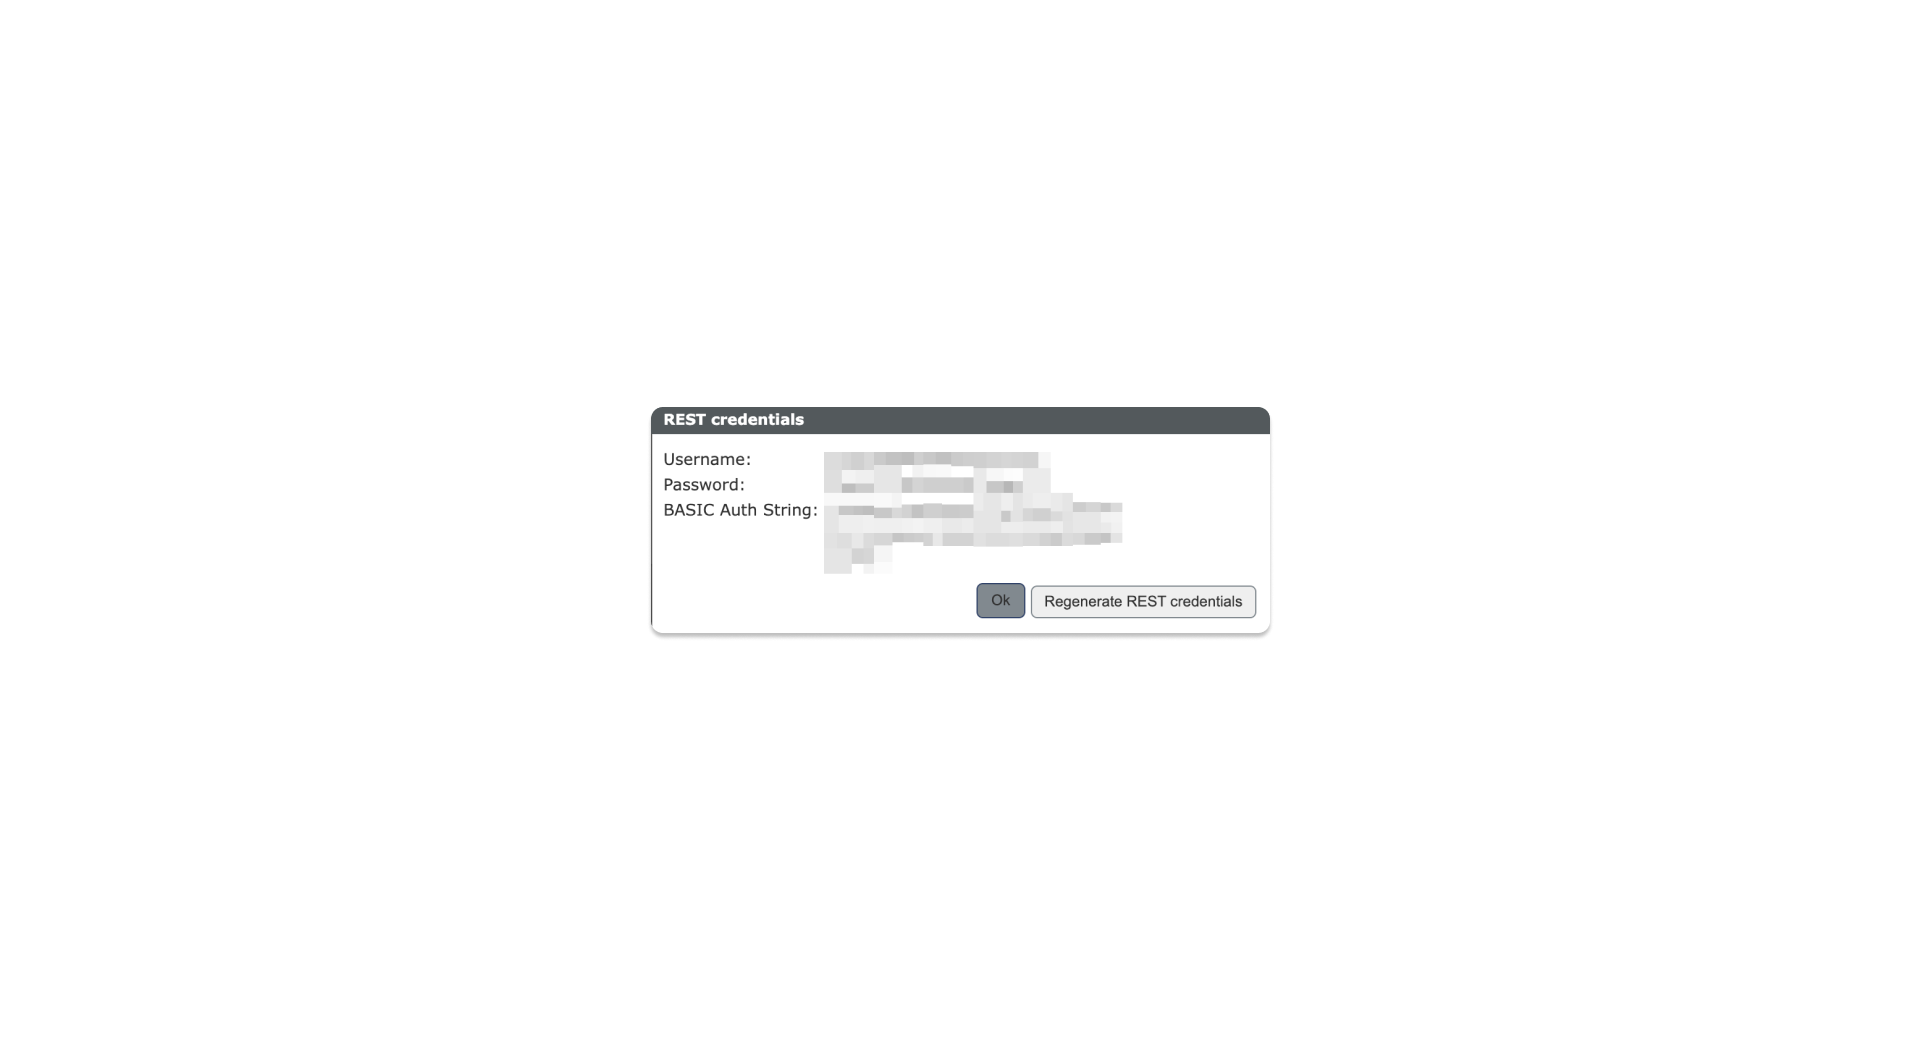
To find the REST password, first log in to the PASCOM Admin UI and click on **Information** > **Developer** in the menu. There you will find a button **Show REST credentials**.
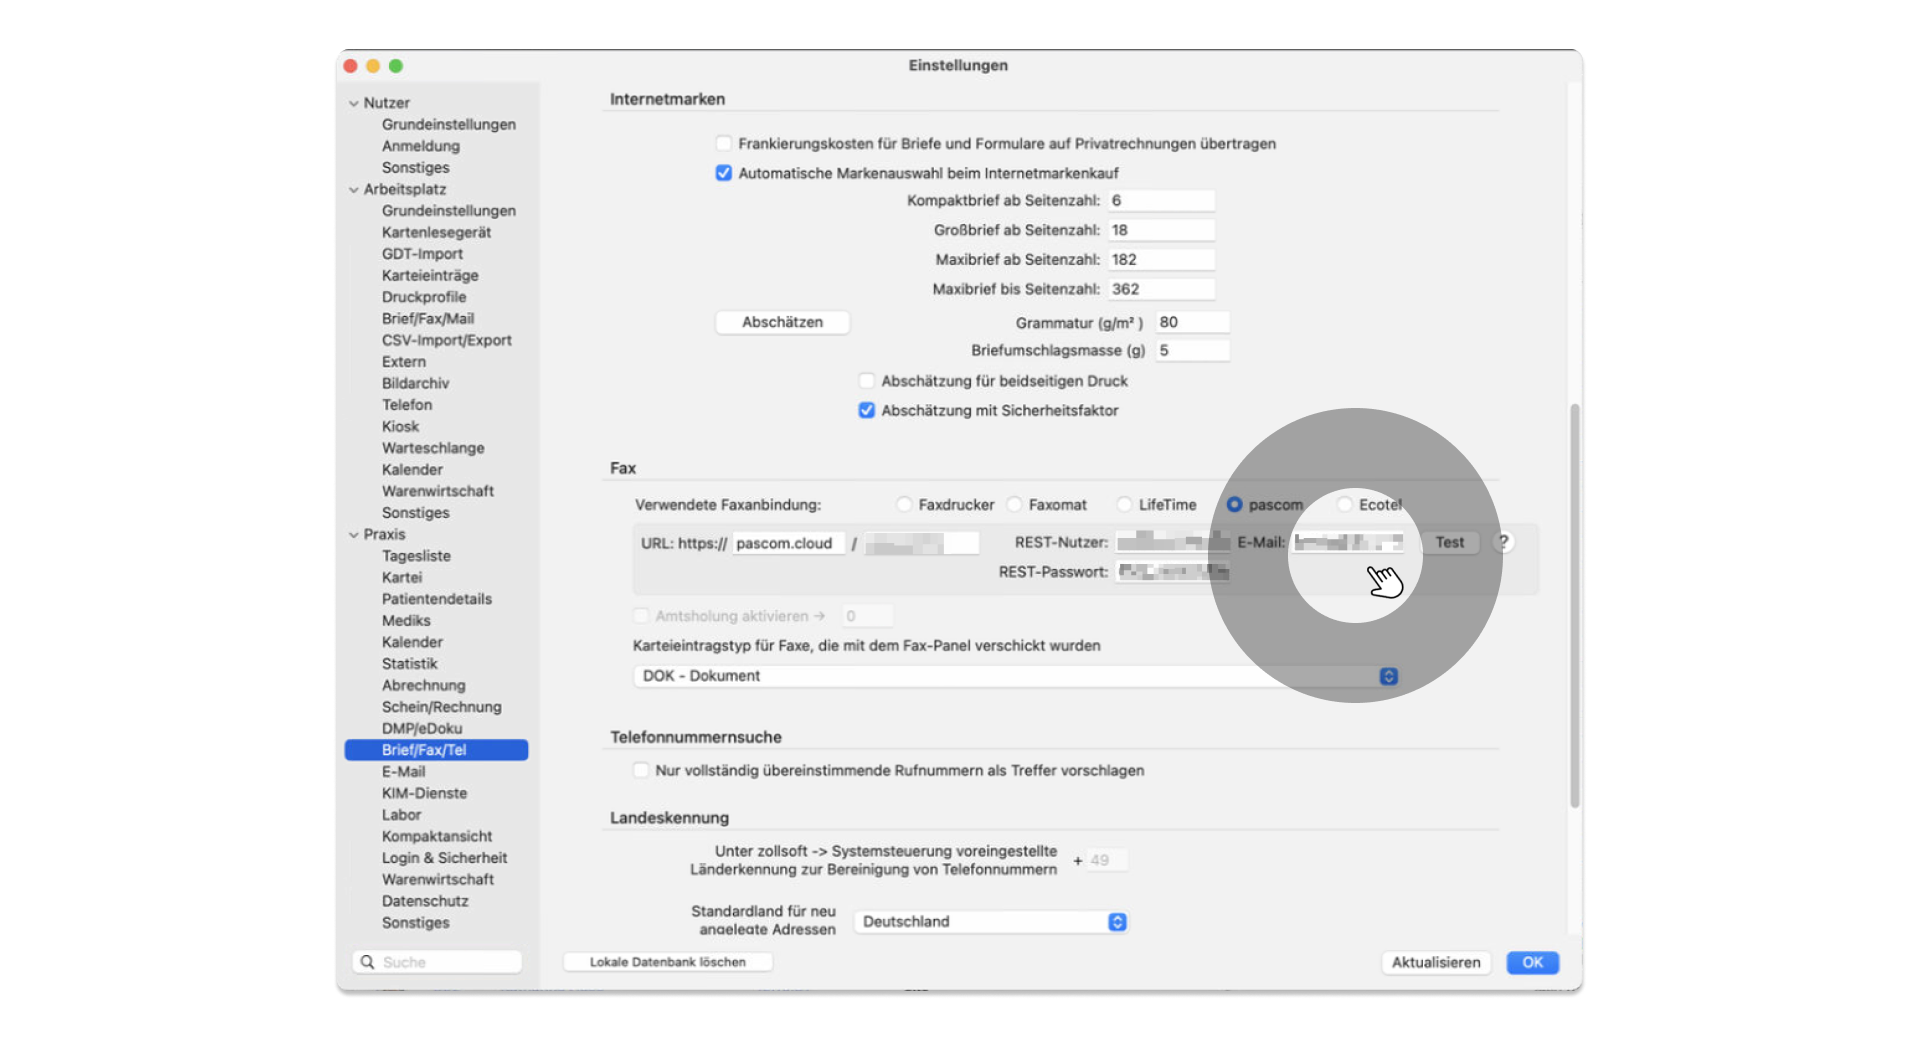
### Store Email Address
If you want to receive a fax report of your sent faxes by email, store an email address as shown in the following image.
### Testing the tomedo® Fax Integration
If you have stored all the necessary data, you can try out the fax integration using the **Test** button.
## Using tomedo® together with PASCOM
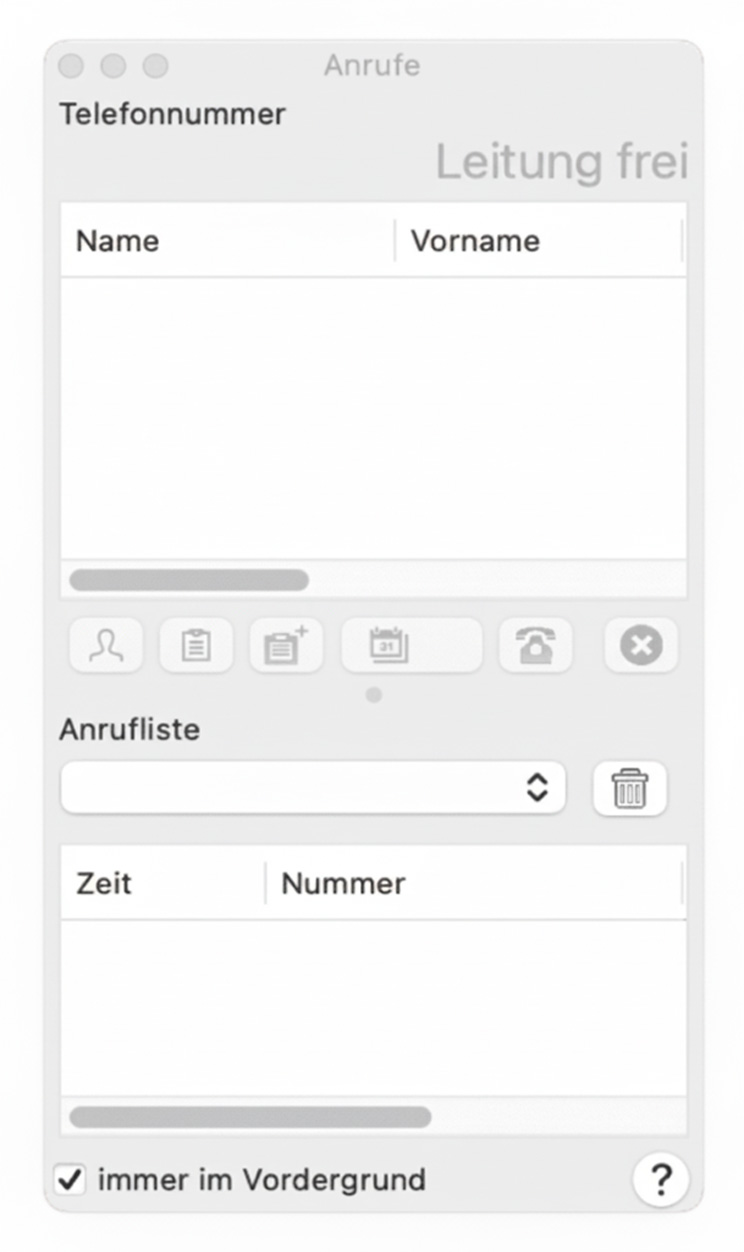
To fully utilize the tomedo®-PASCOM integration, especially the automatic opening of the patient file for an incoming call and the correct resolution of the phone number with the patient's name, it is essential that the call panel in tomedo® is open.
The call panel serves as a bridge between tomedo® and the PASCOM telephone system. It displays information about incoming and outgoing calls and lists past calls. Only when this panel is active can tomedo® match the incoming phone number with the contact data stored in the patient details (phone, business, mobile, and fax) and open the corresponding patient file. Otherwise, only an entry will be created in the file.
You open the call panel in tomedo® via the menu **Panel** → **Calls**.
---
# Agent Instructions
This documentation is published with GitBook. GitBook is the documentation platform designed so that both humans and AI agents can read, navigate, and reason over technical content effectively. Learn more at gitbook.com.
## Querying This Documentation
If you need additional information that is not directly available in this page, you can query the documentation dynamically by asking a question.
Perform an HTTP GET request on the following URL with the `ask` and `goal` query parameters:
```
GET https://docs.pascom.net/en/reference/howto/tomedo-setup.md?ask=&goal=
```
`ask` is the immediate question: it should be specific, self-contained, and written in natural language.
`goal` is what the user is ultimately trying to achieve, the reason they need the answer. Sharing it helps GitBook give you a better, more relevant answer. A goal is most helpful when it describes the outcome the user wants rather than restating the question. For example, with `ask=how do I create an API token`, a goal like `build a script that syncs our docs to a CMS` lets GitBook tailor the answer to that use case.
The response will contain a direct answer to the question and relevant excerpts and sources from the documentation.
Use this mechanism when the answer is not explicitly present in the current page, you need clarification or additional context, or you want to retrieve related documentation sections.