> For the complete documentation index, see [llms.txt](https://docs.pascom.net/llms.txt). Markdown versions of documentation pages are available by appending `.md` to page URLs; this page is available as [Markdown](https://docs.pascom.net/en/operations/clients/tapi-installation.md).
# TAPI Driver Installation
How to use the PASCOM TAPI Driver for Windows in order integrate TAPI enabled software such as MS Office, ERP and CRM systems etc.
The PASCOM TAPI can be installed on any windows desktop. The TAPI Driver will then register itself with the [PASCOM cloud phone system](https://www.pascom.net/en/) using the same credentials as the PASCOM App, which means the TAPI is assigned to a user rather than being directly connected to a telephone.
When a dial command is sent to PASCOM via TAPI, PASCOM will automatically select the current phone of the user and use this phone to make the call. If the user then changes their location or phone, the TAPI will not require any reconfiguration.
The PASCOM TAPI functions independently of the [PASCOM Desktop App](https://www.pascom.net/en/pascom-app/).
### Supported TAPI Functions
The TAPI Interface specifies a number of call related functions, of which the following are supported by the PASCOM TAPI:
| Function | Comment |
| ----------------------------------- | ------------------------------------------------------------ |
| **Signalization of incoming calls** | Signaling of phone numbers, call directions, further details |
| **Pickup** | Complete a pick up on a certain extension |
| **Hold** | Place an active call on hold |
| **Resume** | Retrieve the held calls |
| **Hang Up** | End calls |
| **Call Origination** | Initiate calls to a number |
| **Call Termination** | Automatically terminate calls on the phone |
## Configure the Trunk Code for TAPI
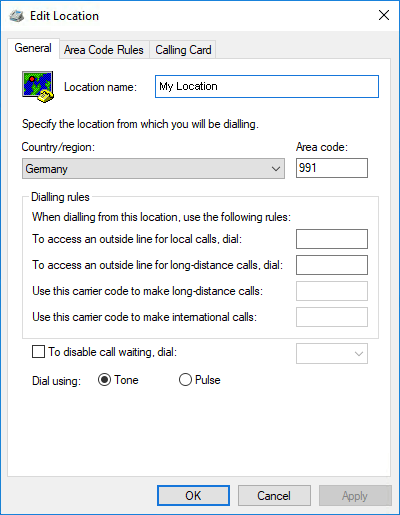
When configuring or first using the TAPI interface, you will be asked for the to be used dial settings. However, phone number handling i.e. setting a 0 for outbound calls, international formatting etc etc. is done exclusively by the PASCOM cloud phone system server, meaning the settings added in windows will be ignored.
The arear code is a mandatory field. Enter your area code without the leading 0. All other fields should be left empty.
This dialog is accessible under **Control Panel** > **Phone and Modem** > **Dialling Rules (My location)** > **Edit**.
## TAPI Driver Installation
{% hint style="warning" %}
1.Ensure no applications are running which the TAPI Interface uses\
2.Ensure that telephony services have been stopped.\
3.You can install a debug as well as productive version, in that you can easily repeat the setup. This is also possible vice versa
{% endhint %}
### Configure ports for TAPI
Use our [port-overview](/en/reference/port-overview.md) to make the necessary approvals for the PASCOM TAPI.
### TAPI Software Download
The current PASCOM TAPI Driver Versopn can be [downloaded](https://www.pascom.net/en/downloads/) from the PASCOM Homepage.
### Installation on a Windows Computer
Start the setup procedure using the file you just downloaded, accept the terms and conditions and finally all the necessary components will be installed.
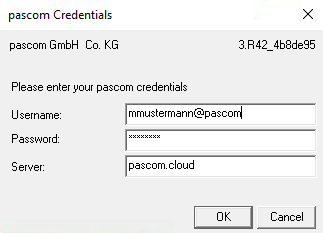
After the installation has been successfully completed, you will need to configure the connection of the TAPI to PASCOM:
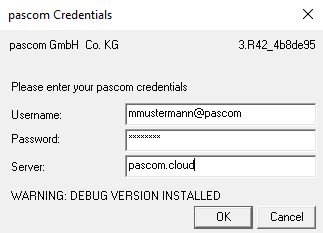
As stated before, the TAPI will login with the same user data just like the PASCOM App
| Variable | Description |
| --------------- | ------------------------------------------ |
| Username | username\@instance |
| Password | users´ password |
| mobydick Server | IP number of hostname of the PASCOM Server |
You can now confirm the successful installation by clicking on **Finish**.
### Installation on a Terminal Server
#### Configuration of the PASCOM Phone System
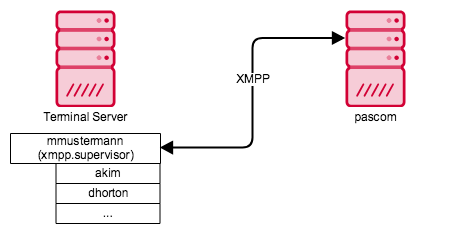
Should you wish to install the TAPI on a Terminal Server or on a computer that is used by more than one person, then you will need assign the users, who will connect using the TAPI, with the ***xmpp.supervisor Role***. This means that only one individual XMPP connection will be constructed from the Terminal Server, over which the total communication will be transmitted.
#### Installation
{% hint style="info" %}
The setup requires administrative rights for the corresponding server. From Windows Server 2008 onwards, the system will automatically ask for the appropriate login, however, if you are using Windows Server 2003 you will need to login using the appropriate identifier first.
{% endhint %}
Start the setup procedure using the file you just downloaded, accept the terms and conditions and finally all the necessary components will be installed.
After the installation has been successfully completed, you will need to configure the connection of the TAPI to PASCOM:
As stated before, the TAPI will login with the same user data just like the PASCOM App.
| Variable | Description |
| --------------- | ------------------------------------------ |
| Username | username\@instance |
| Password | users´ password |
| mobydick Server | IP number or hostname of the PASCOM Server |
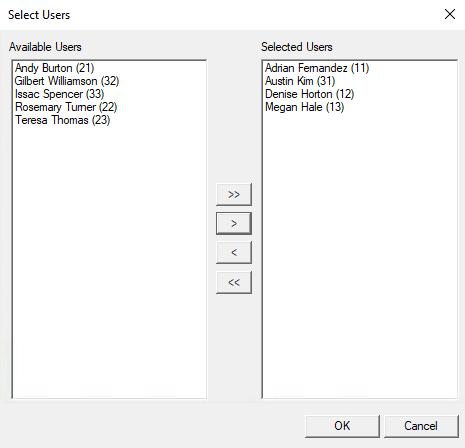
Now a further dialogue box will appear, in which you will be able to select the users, who should be available later within TAPI applications (e.g. MS Outlook). All the existing users will be displayed within the list. In order to choose a user, one can double click on the desired user or use the buttons in between the two list screens:
You can now confirm the successful installation by clicking on **Finish**.
{% hint style="info" %}
Should, at a later point in time, further users be assigned permissions or have permissions removed, permissions can be refreshed using the Control Panel > Phone and Modem > Advanced and then double clicking "pascom TAPI Service Provider". To do this, the Supervisor User must login again.
{% endhint %}
### Example scenario with Microsoft Outlook
Start Outlook and select the desired contact entry.
{% hint style="info" %}
In order to be able to use the call function, in Outlook go to My Contacts and then select either the view: Business Cards, Cards, Phone or List. PASCOM telephony is not supported under the "People" view.
{% endhint %}
Using the right mouse button, select the number to call from the drop down menu:

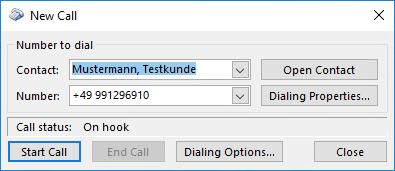
Now the New Call window will appear: confirm the number by clicking **Start call**:
Now your telephone should make the call.
{% hint style="info" %}
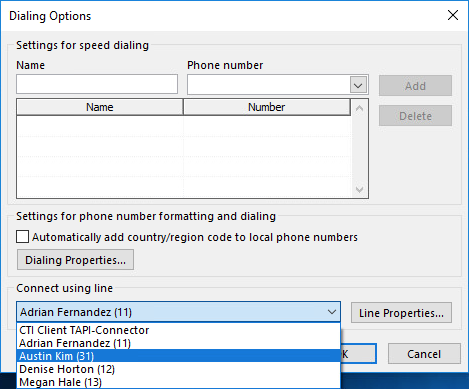
On terminal server installations, every user must select their "own" line within the TAPI Software (e.g. MS Outlook), before they will be able to complete a call using their phone.
{% endhint %}
By clicking **Dial Options** you can select line to be used:
### Unattended (Silent) Installation
It is also possible to install the TAPI without needing any GUI interaction. In order to do this, the installations programme must be called up using the following options:
```
pc-tapi-setup-3.
R42_4b8de95.exe /S /options=username@instance:password:server.domain.tld
Example:
pc-tapi-setup-3.R42_4b8de95.exe /S /options=mmustermann@pascom:12345678:pascom.cloud
```
If the TAPI user has the ***xmpp.supervisor*** **Role**, all available users will be automatically selected and will then be available within the TAPI application.
## TAPI Debugging
If you uncover a problem when using the TAPI Driver, you can use this manual to start a TRACE, which can then be analyzed by PASCOM and helping in finding a solution.
### Preparation
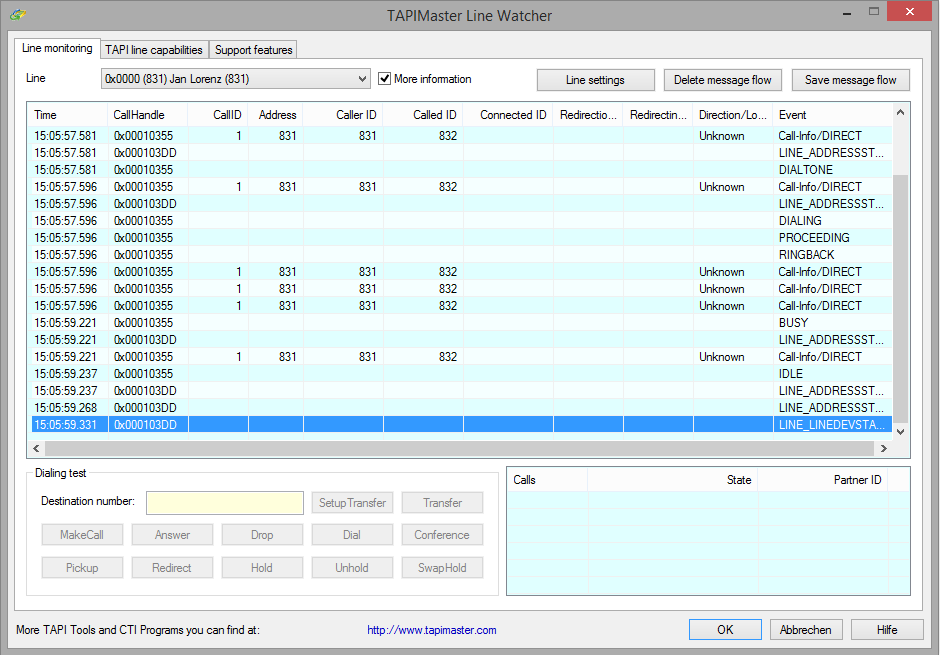
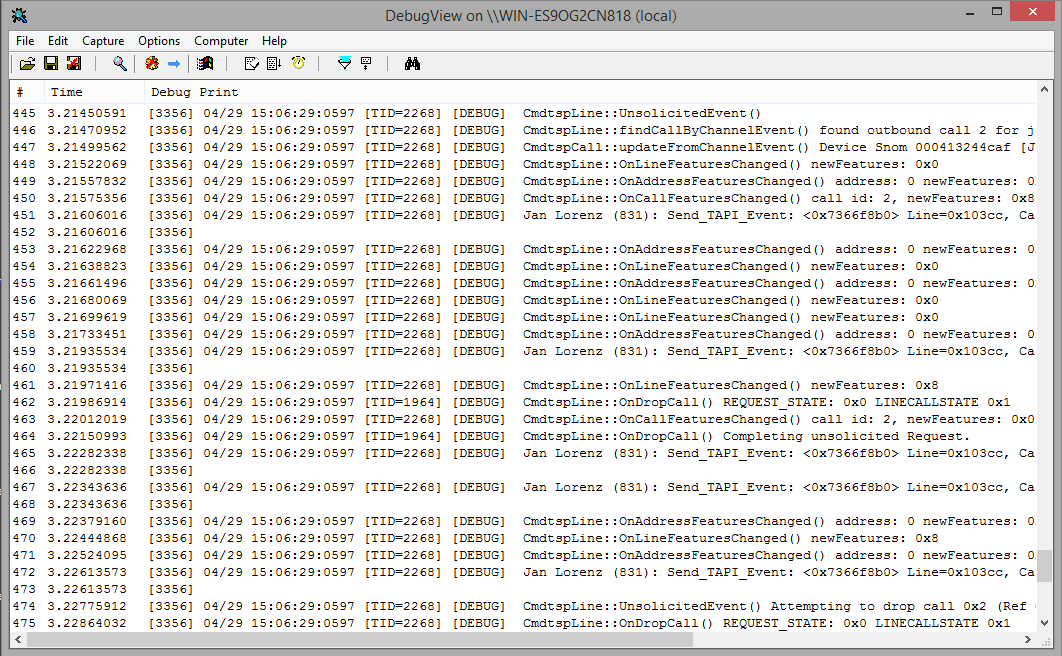
In order to record the TAPI debug output, you will need the DebugView tool from Microsoft/Sysinternals which can be downloaded here: In addition, it is often also a good idea to record the call construction by using the tool "Tapi Master Line Watcher"() in parallel to the Debug tool
{% hint style="warning" %}
Please note: Should programme behaviour change as a result of the Line Watch tool, then complete the debugging **without** it.
{% endhint %}
### Install the PASCOM TAPI Driver in the Debug-Version
In order to be able to record Debug Output, the debug version of the PASCOM driver must be installed. Whether you have the productive or debug version installed can be easily identified using the configurations dialog.
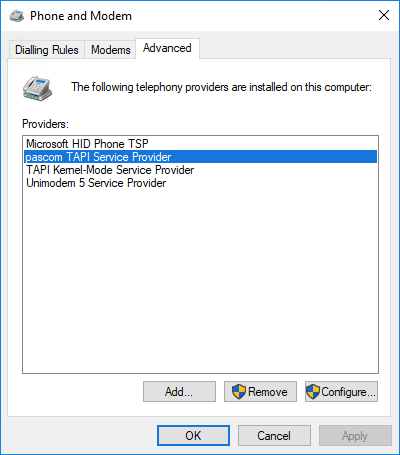
1. Go to the command panel > telephone and modem
2. Go to the "Advanced" Tab
3. Select the entry "pascom TAPI Service Provider"
4. Click Configure
5. If in the following mask, the warning "WARNING: DEBUG VERSION INSTALLED" appears, then clearly the Debug-Version is installed
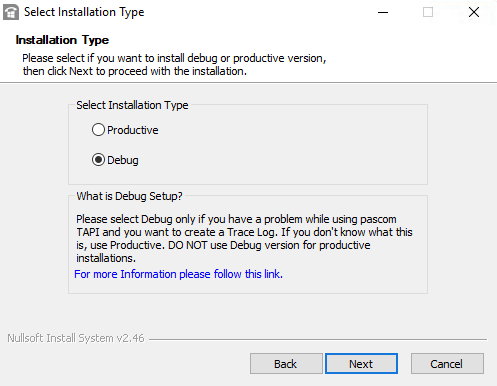
Should you still not be certain, then please close all programmes and run the setup again. Please take note of the installation notices and during the installation select, "Debug" and confirm this by clicking next.
This will replace any productive versions installed with the Debug version
### Preforming a Debugging
You now have all the necessary components downloaded and installed, so start the required tools
#### Open DebugView
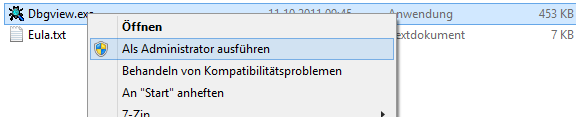
1. Start the DebugView\.exe with Administrator Privileges by right clicking and selecting `Run as Administrator`.
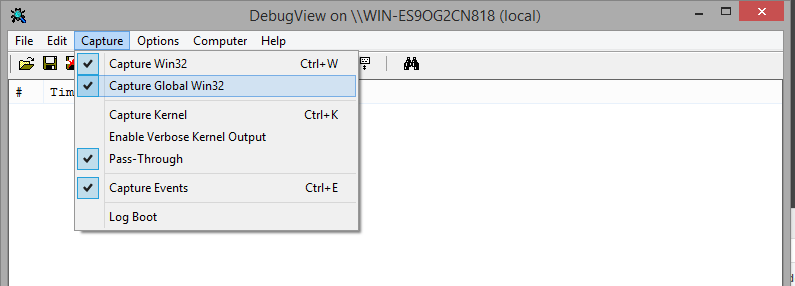
2. Under the "Capture" menu, please check the "Capture Global Win32" option. If you did not run the programme as an administrator, a error message will appear.
**Open Line Watcher**
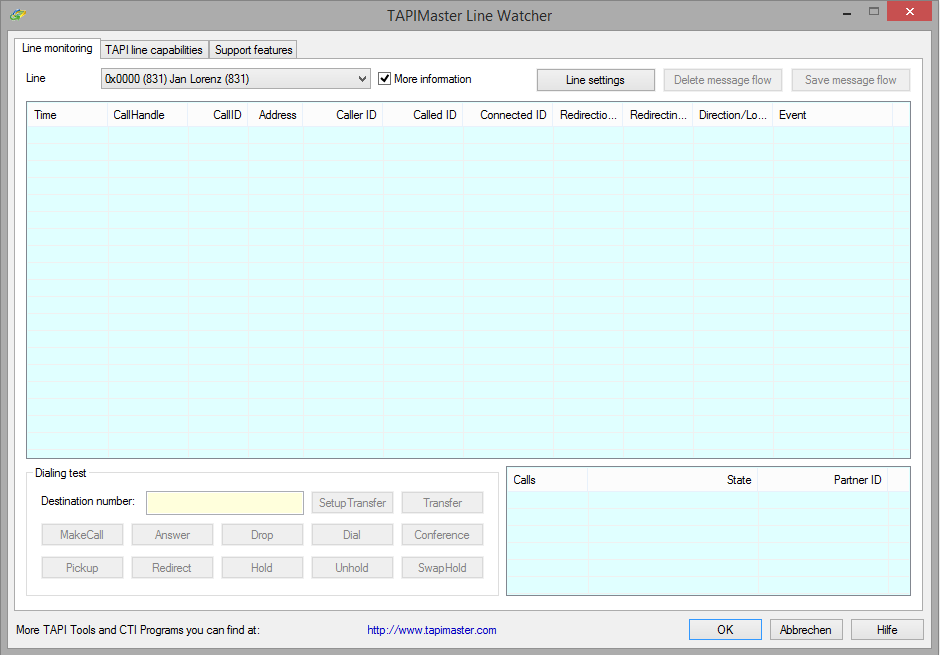
1. Start the programme - no special permissions required
2. In the Drop Down under the first tab, select the user´s TAPI Line causing the problems
3. Check the options box "More information"
Next, start your TAPI software and follow those steps which lead to the problem. In the DebugView window, a whole range of tasks should be visible. As long as you start or receive a call information should also appear in Line Watcher.
Once the test is finished, save both trace outputs from both applications (DebugView and LineWatcher).
#### Saving a DebugView Trace
1. Click on File > Save as
2. Give it an appropriate name
3. Save
#### Saving a LineWatcher Trace
1. Click on "Save Message Flow"
2. Give it an appropriate name
3. Save
You can now send both files to PASCOM for analysis.
---
# Agent Instructions
This documentation is published with GitBook. GitBook is the documentation platform designed so that both humans and AI agents can read, navigate, and reason over technical content effectively. Learn more at gitbook.com.
## Querying This Documentation
If you need additional information that is not directly available in this page, you can query the documentation dynamically by asking a question.
Perform an HTTP GET request on the following URL with the `ask` and `goal` query parameters:
```
GET https://docs.pascom.net/en/operations/clients/tapi-installation.md?ask=&goal=
```
`ask` is the immediate question: it should be specific, self-contained, and written in natural language.
`goal` is what the user is ultimately trying to achieve, the reason they need the answer. Sharing it helps GitBook give you a better, more relevant answer. A goal is most helpful when it describes the outcome the user wants rather than restating the question. For example, with `ask=how do I create an API token`, a goal like `build a script that syncs our docs to a CMS` lets GitBook tailor the answer to that use case.
The response will contain a direct answer to the question and relevant excerpts and sources from the documentation.
Use this mechanism when the answer is not explicitly present in the current page, you need clarification or additional context, or you want to retrieve related documentation sections.