> For the complete documentation index, see [llms.txt](https://docs.pascom.net/llms.txt). Markdown versions of documentation pages are available by appending `.md` to page URLs; this page is available as [Markdown](https://docs.pascom.net/en/integrations/connector/whatsapp-business.md).
# WhatsApp Business Connector
This guide takes you step-by-step through setting up the WhatsApp Business Connector.
The PASCOM Cloud phone system enables the integration of WhatsApp Business, to connect your WhatsApp Business account directly to the PASCOM Cloud phone system. The special highlight here is that WhatsApp communication takes place via PASCOM Teams, which optimizes communication and further improves collaboration within teams.
{% hint style="info" %}
**Important Note:** Each PASCOM telephone system can only have one WhatsApp Business Connector, which is linked to a single WhatsApp Business account. However, this WhatsApp account can be linked to multiple phone numbers.
{% endhint %}
### 1. Create a new WhatsApp Business Connector
Log in to the Admin UI of your PASCOM Cloud phone system. Follow the steps below to set up the WhatsApp Business Connector:
1. Click **Settings** in the main menu.
2. Navigate to the **Connector** section.
3. Click **Add** to create a new connector.
4. Select the **WhatsApp Business** template from the list of available connectors.
5. Assign a unique label to the connector.
6. Click **Save**.
### 2. Connect WhatsApp Business with PASCOM
After the connector has been created, the next step is to connect your WhatsApp Business account to your PASCOM Cloud phone system. This process requires you to log in to a Facebook account that is linked to your WhatsApp Business account.
{% hint style="success" %}
**Best practice:** Before you begin the following steps, switch to your Meta Business Account in your browser and connect WhatsApp Business with Facebook. WHY? - During the following steps, this configuration is also possible, but it breaks the connection process between the PASCOM Cloud phone system and your Meta Business Account.
{% endhint %}

Click the **Login with Facebook** button. You will be redirected to an external page where you need to log in with your Facebook credentials.
#### 2.1 Link Meta Business Account
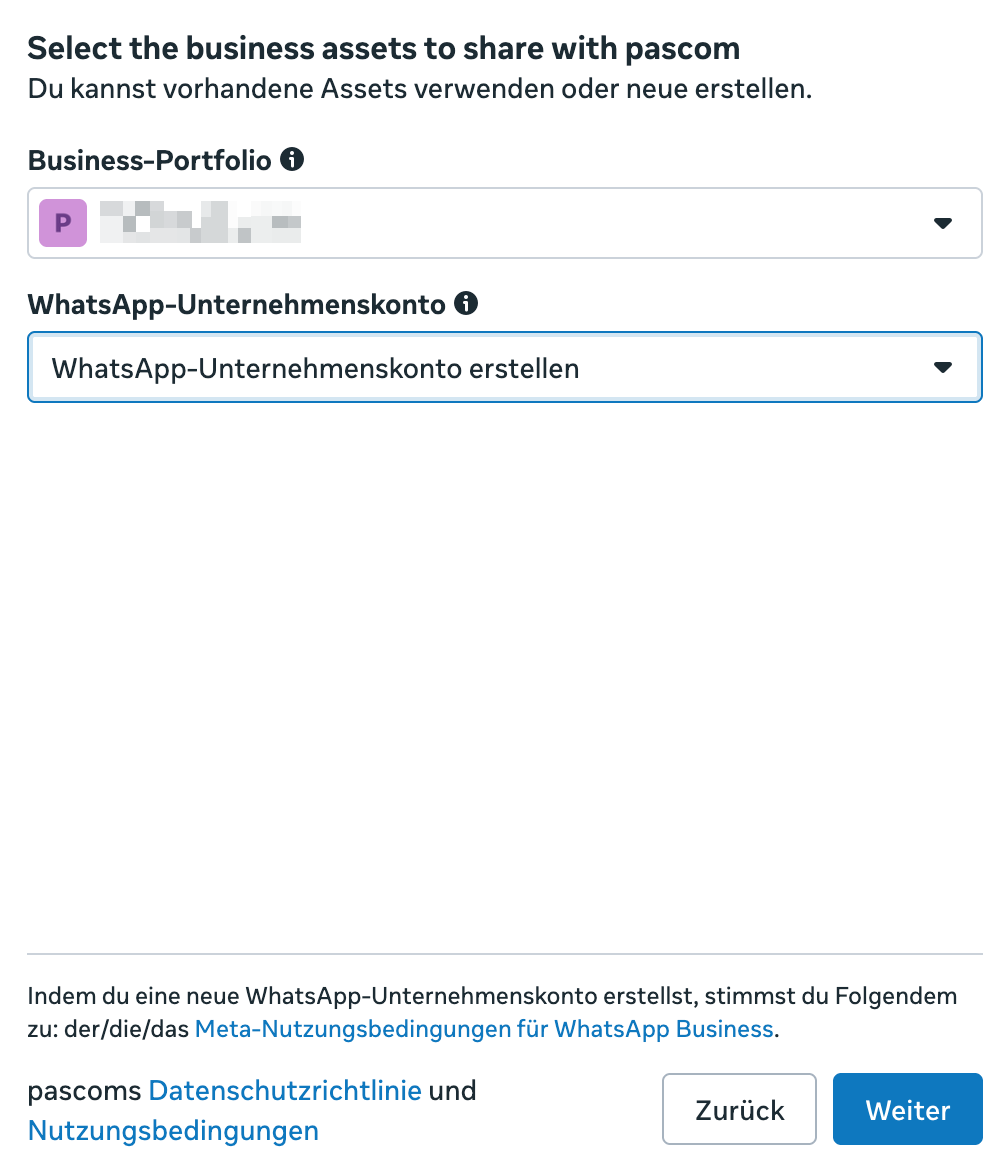
During the login process, you will be prompted to select a business account, as well as specify a WhatsApp business account.
* **Business Portfolio:** Select your existing business portfolio from the dropdown menu (e.g. "My Company").
* **WhatsApp Business Account:** You can select an existing WhatsApp Business account or choose the **"Create WhatsApp Business Account"** option if you don't have one yet.
Confirm the terms of use and click **Next**. Make sure that your Meta Business Account has all the necessary information.
### 3. Add and verify WhatsApp phone number
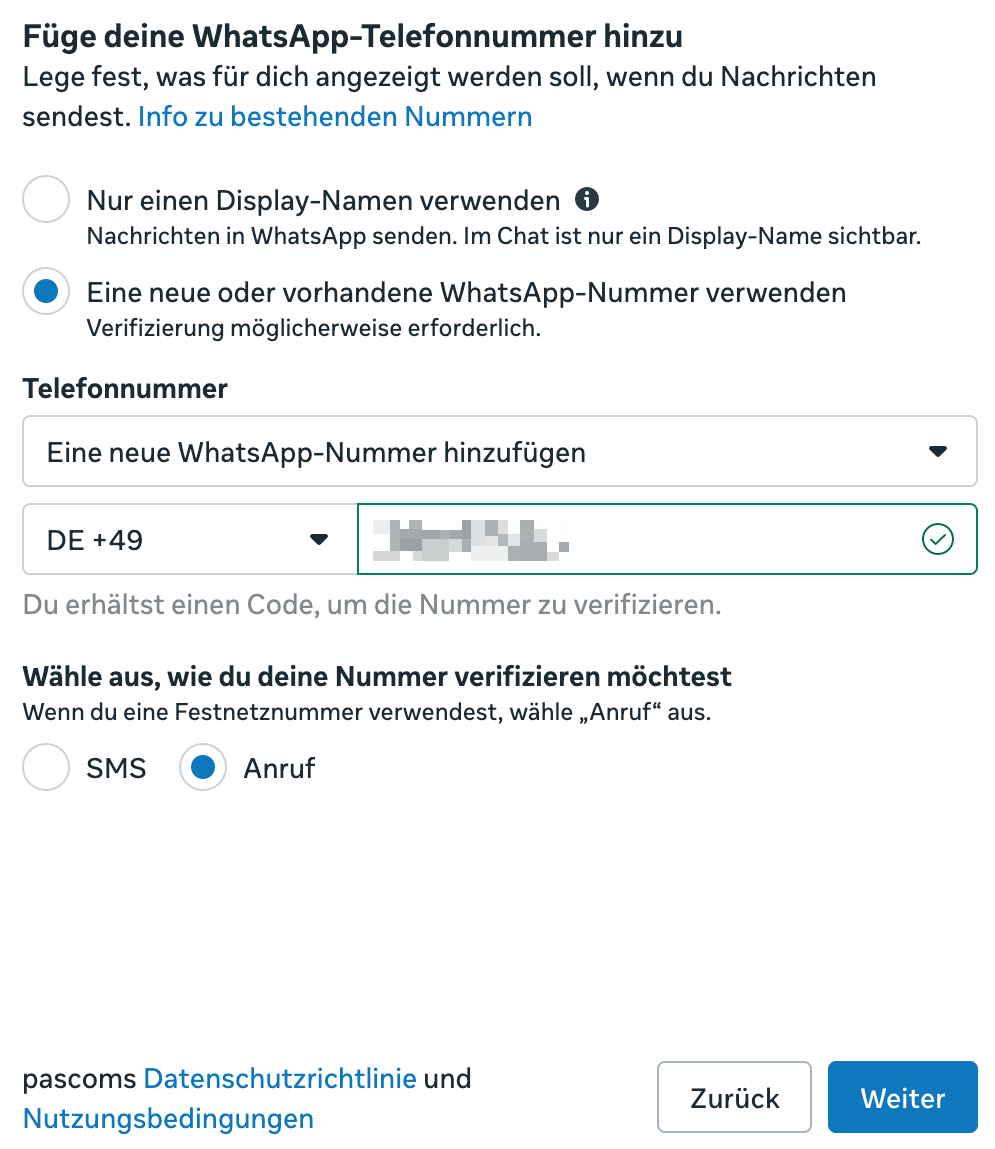
In the next step, add the phone number you want to use for your WhatsApp Business account.
* **Use a new or existing WhatsApp number:** Select this option to use a phone number for your WhatsApp Business account.
* **Phone number:** Enter the phone number from your PASCOM Trunk. Note that any phone number can be used for this, not just mobile numbers.
* **Country code:** Make sure that the correct country code is selected (e.g. DE +49).
#### 3.1 Verification of the phone number
Verification of the phone number is a crucial step.
* **Choose how you want to verify your number:** Via SMS or Call. However, since landline numbers cannot receive SMS, select the **Call** option. For mobile numbers, SMS is of course more convenient.
* **Verification by call:** You will receive an automated call to the specified landline number. During the call, you will be told a PIN that you must then enter in the field provided.
After entering the PIN, click **Next** to complete the verification process. Alternatively, you can also select an existing and verified business number from WhatsApp.
#### 3.2 Synchronization
After successful verification and connection, all linked phone numbers are automatically synchronized into the overview of the phone numbers of the WhatsApp Connector. No special call rules are required in the PASCOM cloud phone system for the WhatsApp Connector.
**Important:** Click **Synchronize** at regular intervals to see the changed status. The display does not update automatically.

### 4. WhatsApp Business Connector Settings
After the Business Connector has been successfully connected and the phone number has been verified, you can make further settings by selecting the WhatsApp Connector in the connector overview and clicking **Edit**.

The settings are divided into different areas:
#### 4.1 Basic data
In the **Basic data** area, you can view and adjust basic information of the connector:
* **Description:** Change the label of the connector to better identify it (e.g. "WhatsApp Business My Company").
* **Wabr-ID:** The WhatsApp Business Account ID is automatically stored here by Meta. Here you have direct access to your META Business Account via a link.
#### 4.2 Phone numbers
In the **Phone numbers** area, you can see the phone numbers linked to your WhatsApp Business account, which are automatically stored by Meta in the PASCOM cloud phone system. Here you can assign these phone numbers to a team in your PASCOM Cloud phone system.
#### 4.3 Templates
The **Templates** section is essential for communication via WhatsApp Business Connector. For data protection reasons and to comply with WhatsApp guidelines, it is mandatory that you always write to a new contact first using an **approved message template**. This applies to all initiatives where you, as a company, make the initial contact.
{% hint style="success" %}
If a contact sends you a message or you reply to an incoming message, you can send freely formulated messages without having to use a template. Please note WhatsApp's 24-hour session rule: as long as the communication session is active (i.e., within 24 hours of the customer's last incoming message), you can exchange unlimited free text messages.
{% endhint %}

Here you can see an overview of your existing message templates and their status.
**4.3.1 Create new message templates**
To create a new message template, click the **Add** button.

Fill in the following fields:
1. **Label:** Enter an internal name for your template (e.g. `service_complete`).
2. **Category:** Select a suitable category for your message from the dropdown menu (e.g. `Service`).
3. **Message text:** Enter the actual text of your message here.
**Use variables:** You can insert dynamic content into your message text by using variables. These are created with the syntax `{{variable}}` (e.g. `{{name}}`, `{{number}}`, `{{department}}`). These variables can be filled individually before sending the message. Note that variable names must be lowercase.
**Example values for your message:** Below the message text you will find fields in which you can store example values for your variables. This helps Meta to check the template and gives you a preview of the finished message.
You can view the current status of the review at any time in the template overview. Click on **Synchronize** from time to time to see the changed status. The display does not update automatically.
You will also receive **an email from META** when the review is complete.
{% hint style="success" %}
Only templates approved by META can be used.
{% endhint %}
---
# Agent Instructions
This documentation is published with GitBook. GitBook is the documentation platform designed so that both humans and AI agents can read, navigate, and reason over technical content effectively. Learn more at gitbook.com.
## Querying This Documentation
If you need additional information that is not directly available in this page, you can query the documentation dynamically by asking a question.
Perform an HTTP GET request on the following URL with the `ask` and `goal` query parameters:
```
GET https://docs.pascom.net/en/integrations/connector/whatsapp-business.md?ask=&goal=
```
`ask` is the immediate question: it should be specific, self-contained, and written in natural language.
`goal` is what the user is ultimately trying to achieve, the reason they need the answer. Sharing it helps GitBook give you a better, more relevant answer. A goal is most helpful when it describes the outcome the user wants rather than restating the question. For example, with `ask=how do I create an API token`, a goal like `build a script that syncs our docs to a CMS` lets GitBook tailor the answer to that use case.
The response will contain a direct answer to the question and relevant excerpts and sources from the documentation.
Use this mechanism when the answer is not explicitly present in the current page, you need clarification or additional context, or you want to retrieve related documentation sections.